Indexing JavaScript content can be complicated. That’s why when we designed Prerender, we ensured that the installation process was simple and fast.
Furthermore, you don’t even have to change your tech stack to enjoy Prerender. Prerender is a plug-and-play solution that works with almost all major frameworks.
Follow the step-by-step installation instructions below, and soon, you can start using Prerender to improve your indexing performance and help boost your technical SEO health.
Prerender Installation Overview
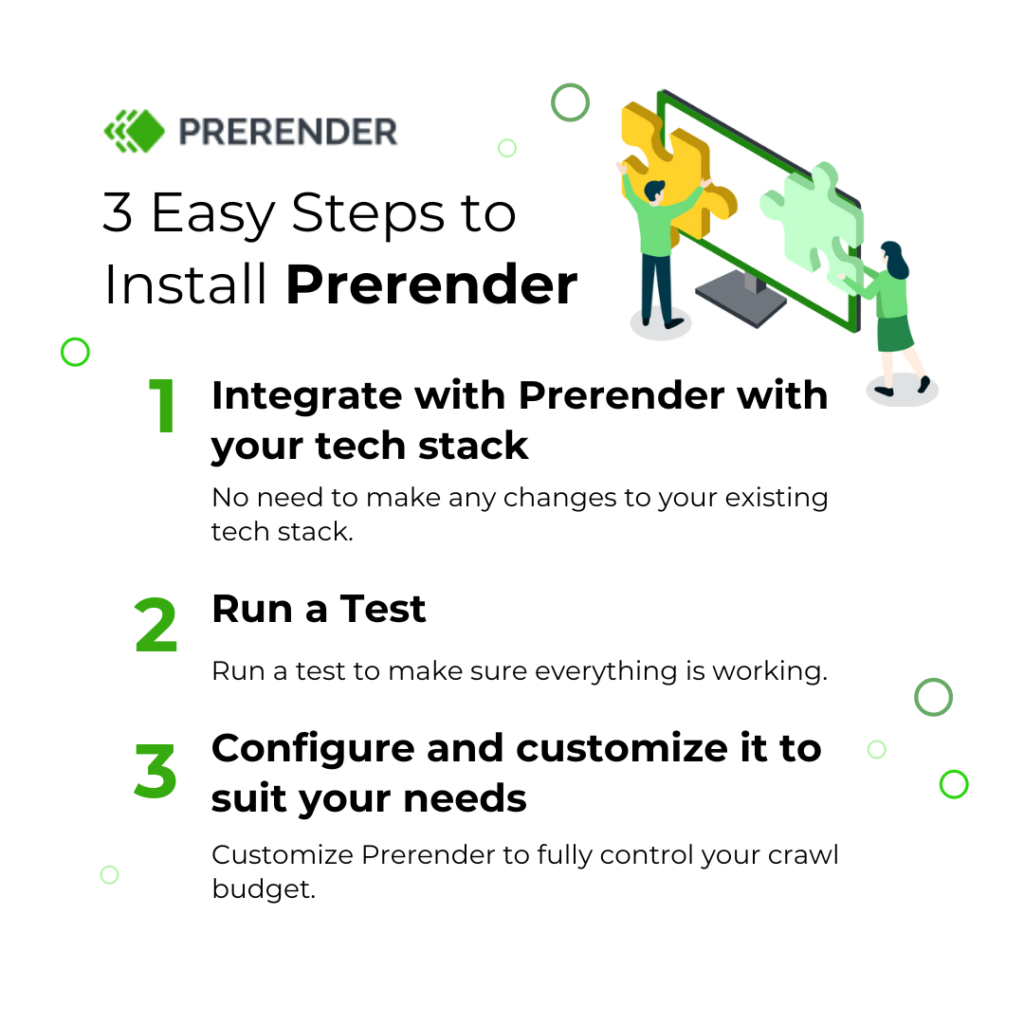
Installing Prerender consists of three steps:
- Integrate with Prerender with your tech stack
- Run a test to make sure everything is working
- Configure and customize it to suit your needs
To integrate with Prerender, first, you need to identify your tech stack and preferred integration method.
Step 1: Integration
Here are 3 installation techniques to install Prerender:
A. Direct Integration
B. Ingress Integration
C. CDN Integration
We’ll break down the installation methods one by one, the most popular languages used for each, and tell you where to install your API code.
That said, no matter which method you choose, the general idea is the same: you will add code to each page that needs to be pre-rendered. That code contains the API key issued to you when you signed up for Prerender.
Additionally, Prerender is compatible with the majority of popular programming languages. To find the complete list, visit this knowledge base document: ‘Prerender Integrations.’
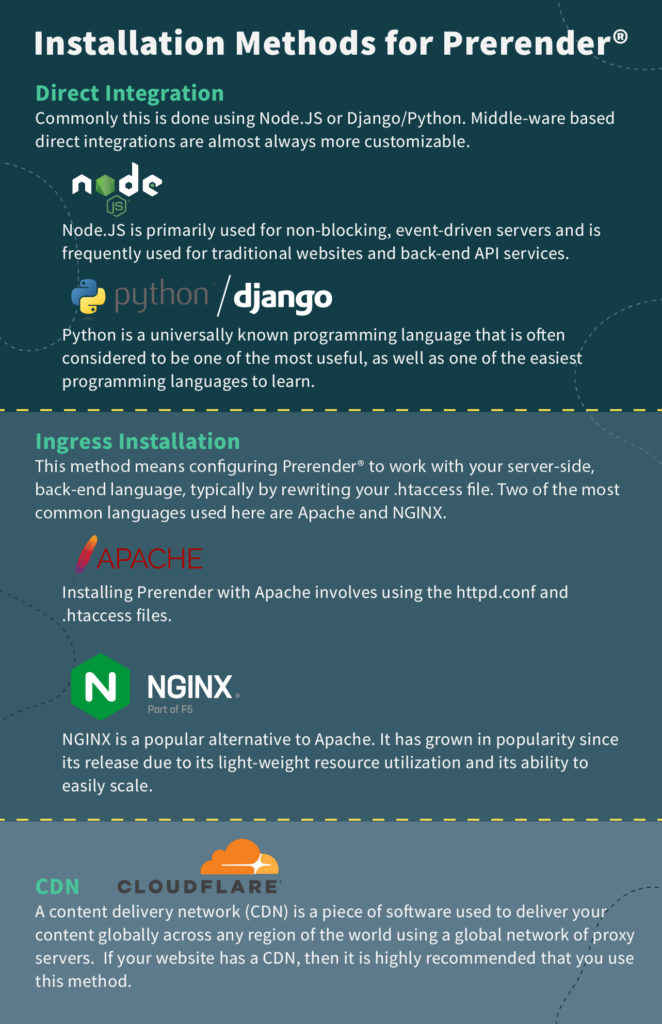
A. Direct Integration
Direct integration involves getting Prerender to work alongside your front-end technology. Commonly, this is done using Node.JS or Django/Python.
Generally, this method is more customizable than the others. This is because the main mechanism is in the code itself, so you can change it to suit your needs rather than in a static configuration.
Node.JS
Node.JS is an open-source JavaScript framework that executes your content outside the web browser. It’s primarily used for non-blocking, event-driven servers, traditional websites, and back-end API services.
Our Node.JS middleware intercepts HTTP file requests from browsers and then calls Prerender to deliver the static HTML version of your page.
Related: See how Prerender works in solving JavaScript SEO problems.
Here’s how to install Prerender for a Node.JS-based website.
-
- First, install the Prerender node via npm:
$ npm install prerender-node –save
-
- Set up the express app:
app.use(require(‘prerender-node’));
OR, if you already have the Prerender.io API token:
app.use(require('prerender-node').set('prerenderToken', 'YOUR_TOKEN'));
You can read or watch the installation instructions for Node.JS here.
Python/Django
Python is a programming language that is often considered as one of the most useful and easiest programming languages to learn. It’s an all-purpose programming language that emphasizes the importance of code readability and features frequent use of indentation.
Here’s how to install Prerender for a Python-based website.
-
- First, do a PIP install:
pip install django-seo-js
2. Add the pip install to your settings.py file:
# If in doubt, just include both.  Details below.
MIDDLEWARE_CLASSES = (
    'django_seo_js.middleware.EscapedFragmentMiddleware',  # If you're using #!
    'django_seo_js.middleware.UserAgentMiddleware',  # If you want to detect by user agent
) + MIDDLEWARE_CLASSES
INSTALLED_APPS += ('django_seo_js',)
# If you're using prerender.io (the default backend):
SEO_JS_PRERENDER_TOKEN = "123456789abcdefghijkl"  # Really, put this in your env, not your codebase.
3. Finally, add it to your base.html file:
{% load django_seo_js %}
<head>
    {% seo_js_head %}
    ...
</head>
You can read the installation instructions for Python here.
B. Ingress Installation
Choosing an ingress method of installing Prerender means configuring Prerender to work with your server-side, back-end language, typically by rewriting your .htaccess file. Two of the most common languages used here are Apache and NGINX.
Apache
Apache is a server-side scripting language commonly used in enterprise web applications. It’s used by roughly 67% of all the web servers in the world. It is easy to customize, fast, reliable, and used by websites that get upwards of hundreds of thousands of sessions per month.
Installing Prerender with Apache involves using the httpd.conf and .htaccess files. You can read or watch Apache installation instructions here.
Here’s how to install Prerender for an Apache-based website.
-
- Put this codeblock into your .htaccess file and remove the / comments to allow the use of a proxy over https
LoadModule headers_module libexec/apache2/mod_headers.so
LoadModule proxy_module libexec/apache2/mod_proxy.so
LoadModule proxy_http_module libexec/apache2/mod_proxy_http.so
LoadModule ssl_module libexec/apache2/mod_ssl.so
LoadModule rewrite_module libexec/apache2/mod_rewrite.so
-
- Add this to the bottom of the .conf file:
# Prerender.io configuration
# Allow proxying over https
SSLProxyEngine on
# These two commands ignore the validity of the SSL Certificate of the Prerender server
# Only uncomment the two SSLProxy lines if you are testing with a local prerender server over https with a self-signed cert
# A hosted Prerender server should have a valid SSL Certificate so the next two lines can stay commented in production
#SSLProxyCheckPeerName off
#SSLProxyVerify none
.htaccess
This is the actual configuration that sends the request to Prerender:
# Change YOUR_TOKEN to your prerender token
# Change https://service.prerender.io/ (at the end of the last RewriteRule)
# to http://localhost:3000/ when testing with a local prerender server
<IfModule mod_headers.c>
    RequestHeader set X-Prerender-Token "YOUR_TOKEN"
    RequestHeader set X-Prerender-Version "prerender-apache@2.0.0"
</IfModule>
<IfModule mod_rewrite.c>
    RewriteEngine On
    <IfModule mod_proxy_http.c>
        RewriteCond %{HTTP_USER_AGENT} googlebot|bingbot|yandex|baiduspider|facebookexternalhit|twitterbot|rogerbot|linkedinbot|embedly|quora\ link\ preview|showyoubot|outbrain|pinterest\/0\.|pinterestbot|slackbot|vkShare|W3C_Validator|whatsapp [NC,OR]
        RewriteCond %{QUERY_STRING} _escaped_fragment_
        RewriteCond %{REQUEST_URI} ^(?!.*?(\.js|\.css|\.xml|\.less|\.png|\.jpg|\.jpeg|\.gif|\.pdf|\.doc|\.txt|\.ico|\.rss|\.zip|\.mp3|\.rar|\.exe|\.wmv|\.doc|\.avi|\.ppt|\.mpg|\.mpeg|\.tif|\.wav|\.mov|\.psd|\.ai|\.xls|\.mp4|\.m4a|\.swf|\.dat|\.dmg|\.iso|\.flv|\.m4v|\.torrent|\.ttf|\.woff|\.svg))
        RewriteRule ^(index\.html|index\.php)?(.*) https://service.prerender.io/%{REQUEST_SCHEME}://%{HTTP_HOST}/$2 [P,END]
    </IfModule>
</IfModule>
NGINX
NGINX is a popular alternative to Apache. It has grown in popularity since its release due to its light-weight resource utilization and ability to scale easily. It’s also useful for serving static content easily and passing requests for dynamic content off to other software – which is exactly what makes it so compatible with Prerender.
You can read or watch the installation instructions for Nginx here.
The official nginx.conf for Prerender is below.
# Change YOUR_TOKEN to your prerender token
# Change example.com (server_name) to your website url
# Change /path/to/your/root to the correct value
server {
    listen 80;
    server_name example.com;
    root   /path/to/your/root;
    index  index.html;
    location / {
        try_files $uri @prerender;
    }
    location @prerender {
        proxy_set_header X-Prerender-Token YOUR_TOKEN;
        set $prerender 0;
        if ($http_user_agent ~* "googlebot|bingbot|yandex|baiduspider|twitterbot|facebookexternalhit|rogerbot|linkedinbot|embedly|quora link preview|showyoubot|outbrain|pinterest\/0\.|pinterestbot|slackbot|vkShare|W3C_Validator|whatsapp") {
            set $prerender 1;
        }
        if ($args ~ "_escaped_fragment_") {
            set $prerender 1;
        }
        if ($http_user_agent ~ "Prerender") {
            set $prerender 0;
        }
        if ($uri ~* "\.(js|css|xml|less|png|jpg|jpeg|gif|pdf|doc|txt|ico|rss|zip|mp3|rar|exe|wmv|doc|avi|ppt|mpg|mpeg|tif|wav|mov|psd|ai|xls|mp4|m4a|swf|dat|dmg|iso|flv|m4v|torrent|ttf|woff|svg|eot)") {
            set $prerender 0;
        }
        #resolve using Google's DNS server to force DNS resolution and prevent caching of IPs
        resolver 8.8.8.8;
        if ($prerender = 1) {
            #setting prerender as a variable forces DNS resolution since nginx caches IPs and doesnt play well with load balancing
            set $prerender "service.prerender.io";
            rewrite .* /$scheme://$host$request_uri? break;
            proxy_pass http://$prerender;
        }
       if ($prerender = 0) {
            rewrite .* /index.html break;
        }
    }
}
C. CDN (Cloudflare)
A content delivery network (CDN) is software used to deliver your content globally using a global network of proxy servers. Websites with a global audience often use them to deliver web content at the same speed and performance level. Cloudflare is one of the most popular CDN services in the market.
The installation process using the CDN (Cloudflare) method is fairly straightforward, as you can find it here.
If your website has a CDN, it is highly recommended that you use this method. Otherwise, you need to add a caching layer.
Here’s how to integrate Prerender with CDN.
-
- Select your website in Cloudflare:
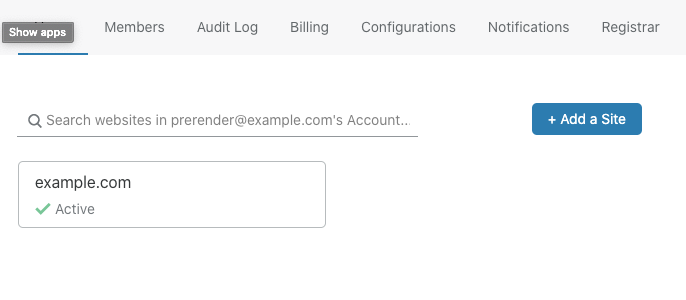
-
- Navigate to Workers -> Manage workers -> Create a worker
-
- Copy and paste the content of index.js over the code editor on the left-hand side, overwriting its current content. Please note the name of the worker for later reference (top-left corner).
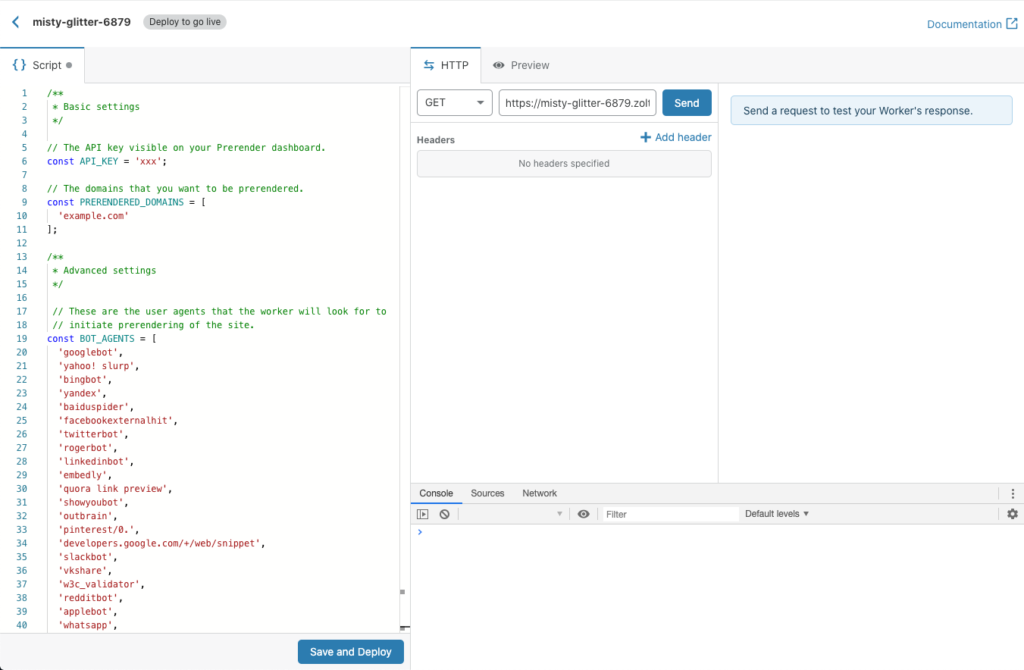
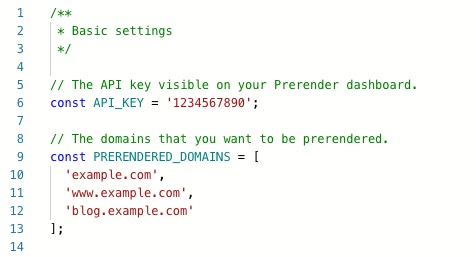
-
- Replace your API_KEY value with your actual API key from the Prerender dashboard, and edit the PRERENDERED_DOMAINS array to match your site configuration.
-
- Click on Save, Deploy, and navigate to the workers from Step 2. Click on Add Route
-
- Edit your route to match your website configuration:
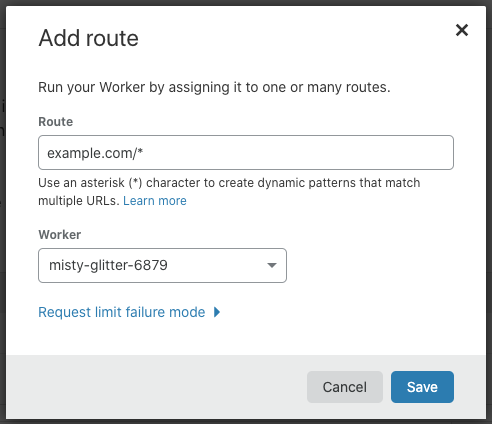
- Click Save, and you’re all set
Step 2: Run a Test
At this point, you should have Prerender installed on your website—but let’s test it to ensure everything is working properly.
We recommend using Chrome to do the following test.
1. Open your desired URL.
2. Open Dev tools (CTRL + Shift + J on Windows, or Option + ⌘ + J on Mac).
3. Run command (Control + Shift + P on Windows, or Command + Shift + P on Mac) > Show Network Conditions.

4. “Enabled” the Network Conditions, navigate to it, look for User Agent, and de-select Use browser default.
5. Select Googlebot from the dropdown list (Note: if you have modified the pre-defined allow list in your Prerender configuration, then use the bot you allowed).
6. Reload your site.
7. Switch to the Network tab and look for the first connections header.
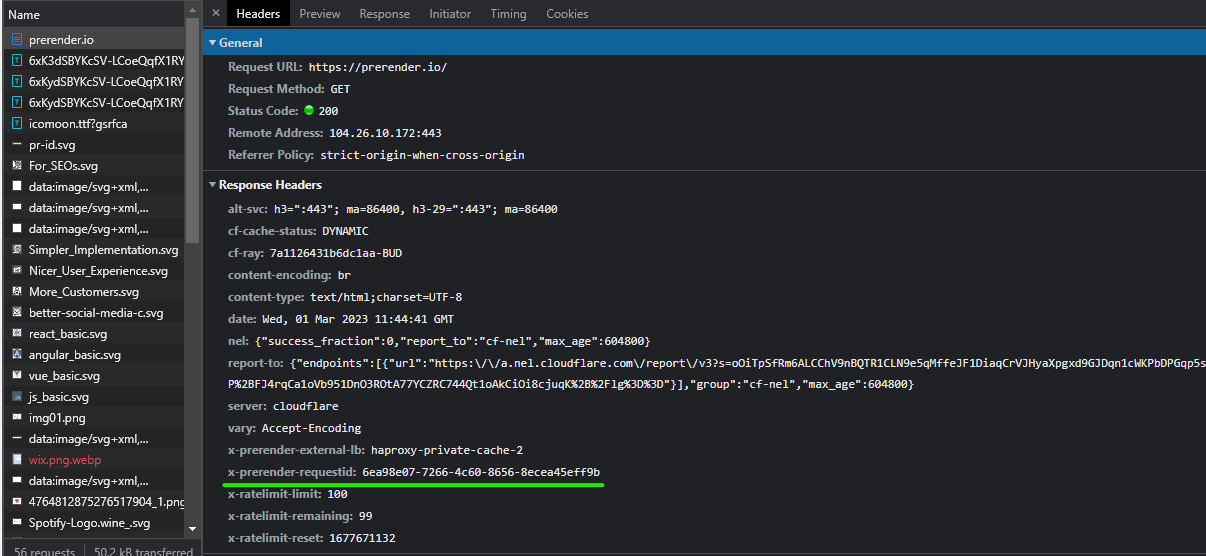
If the response contains x-prerender-requestid then you can conclude that Prerender.io is working on your site and serving the request. Hooray!
If you’re running into problems, you can identify and troubleshoot them using the following guide.
Step 3: Configure Prerender
Installing Prerender and getting it to work properly is one thing; making it work to suit your specific needs is another.
For example, you want to ensure that Prerender only renders pages with indexing issues or set up the (re)caching mechanism.
Here are some basic configurations you can do to Prerender. For more best practices in setting and using Prerender, visit this document.
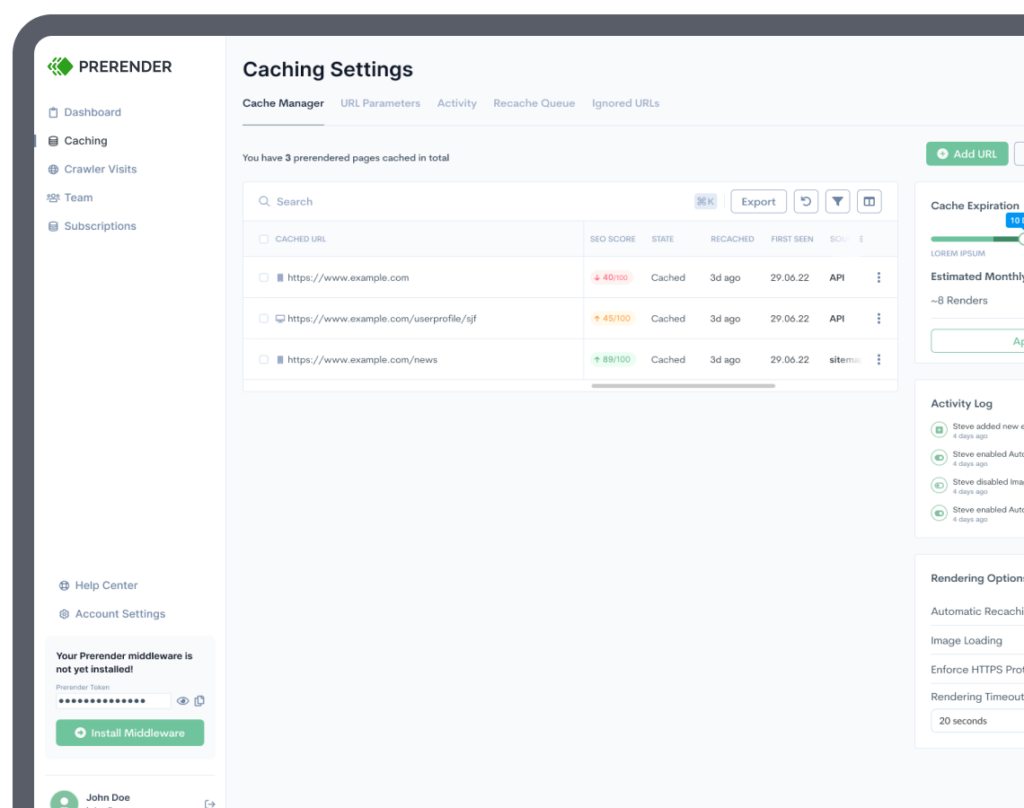
Indicate When You Want Your Pages to Be Cached
Prerender can automatically identify when a page has finished sending HTTP requests. Still, it’s a good idea to give it some direction so the process can go more efficiently.
To do this, put the following HTML code into your <head> section:
<script> window.prerenderReady = false; </script>
Then, execute this function after your AJAX calls:
window.prerenderReady = true;
Configure Your Cache
You may have the wrong pages cached or have pages cached unintentionally. When this happens, use your middleware to whitelist or blacklist pages. Here’s how:
-
- Use the URL parameters section of Prerender.io to ignore specific query parameters (which will tell Prerender to ignore certain URLs). Prerender can then identify the canonical URL to be cached and then ignore the identical ones.
-
- Modify your middleware only to send the URLs you indicate to Prerender.
-
- Set Prerender to return non-200 status codes for pages that you don’t want cached.
More information on how to limit your cache can be found here. You can also use Prerender recache API to cache a URL that has been cached previously. This can be used to recache some of your pages that are often changed.
Prerender Works With Whatever Techstack You Have
Installing Prerender is easy and fast—and you can continue using the tech stack you have to enjoy Prerender. Simply find a middleware that matches your framework, begin the installation process, and voila! Prerender is ready to use.
This getting-started guide will help you set up and get to know Prerender more, including how to control crawling and indexing, how to use Prerender’s 404 checker tool, and Prerender’s sitemap crawler.
If you need help during installation, our customer support team will always have your back. You can contact us here.