Technical SEO is easily one of the most demanding (in terms of technical knowledge) and time-consuming parts of any SEO campaign, especially on large projects where checking thousands or millions of URLs becomes nearly impossible.
That’s why understanding how to use automation is so critical for technical SEO professionals: it allows you to focus on analysis instead of data gathering.
In today’s article, we will explore thirteen Screaming Frog features that’ll save you hundreds of hours and make working with large websites a breeze.
1. Crawl Large Sites Using Database Storage Instead of RAM Storage
Screaming Frog uses your machine’s RAM to store your crawl data by default. Although this makes the process really fast, it’s not the best option to crawl large websites, as your RAM won’t have the capacity to store that much data.
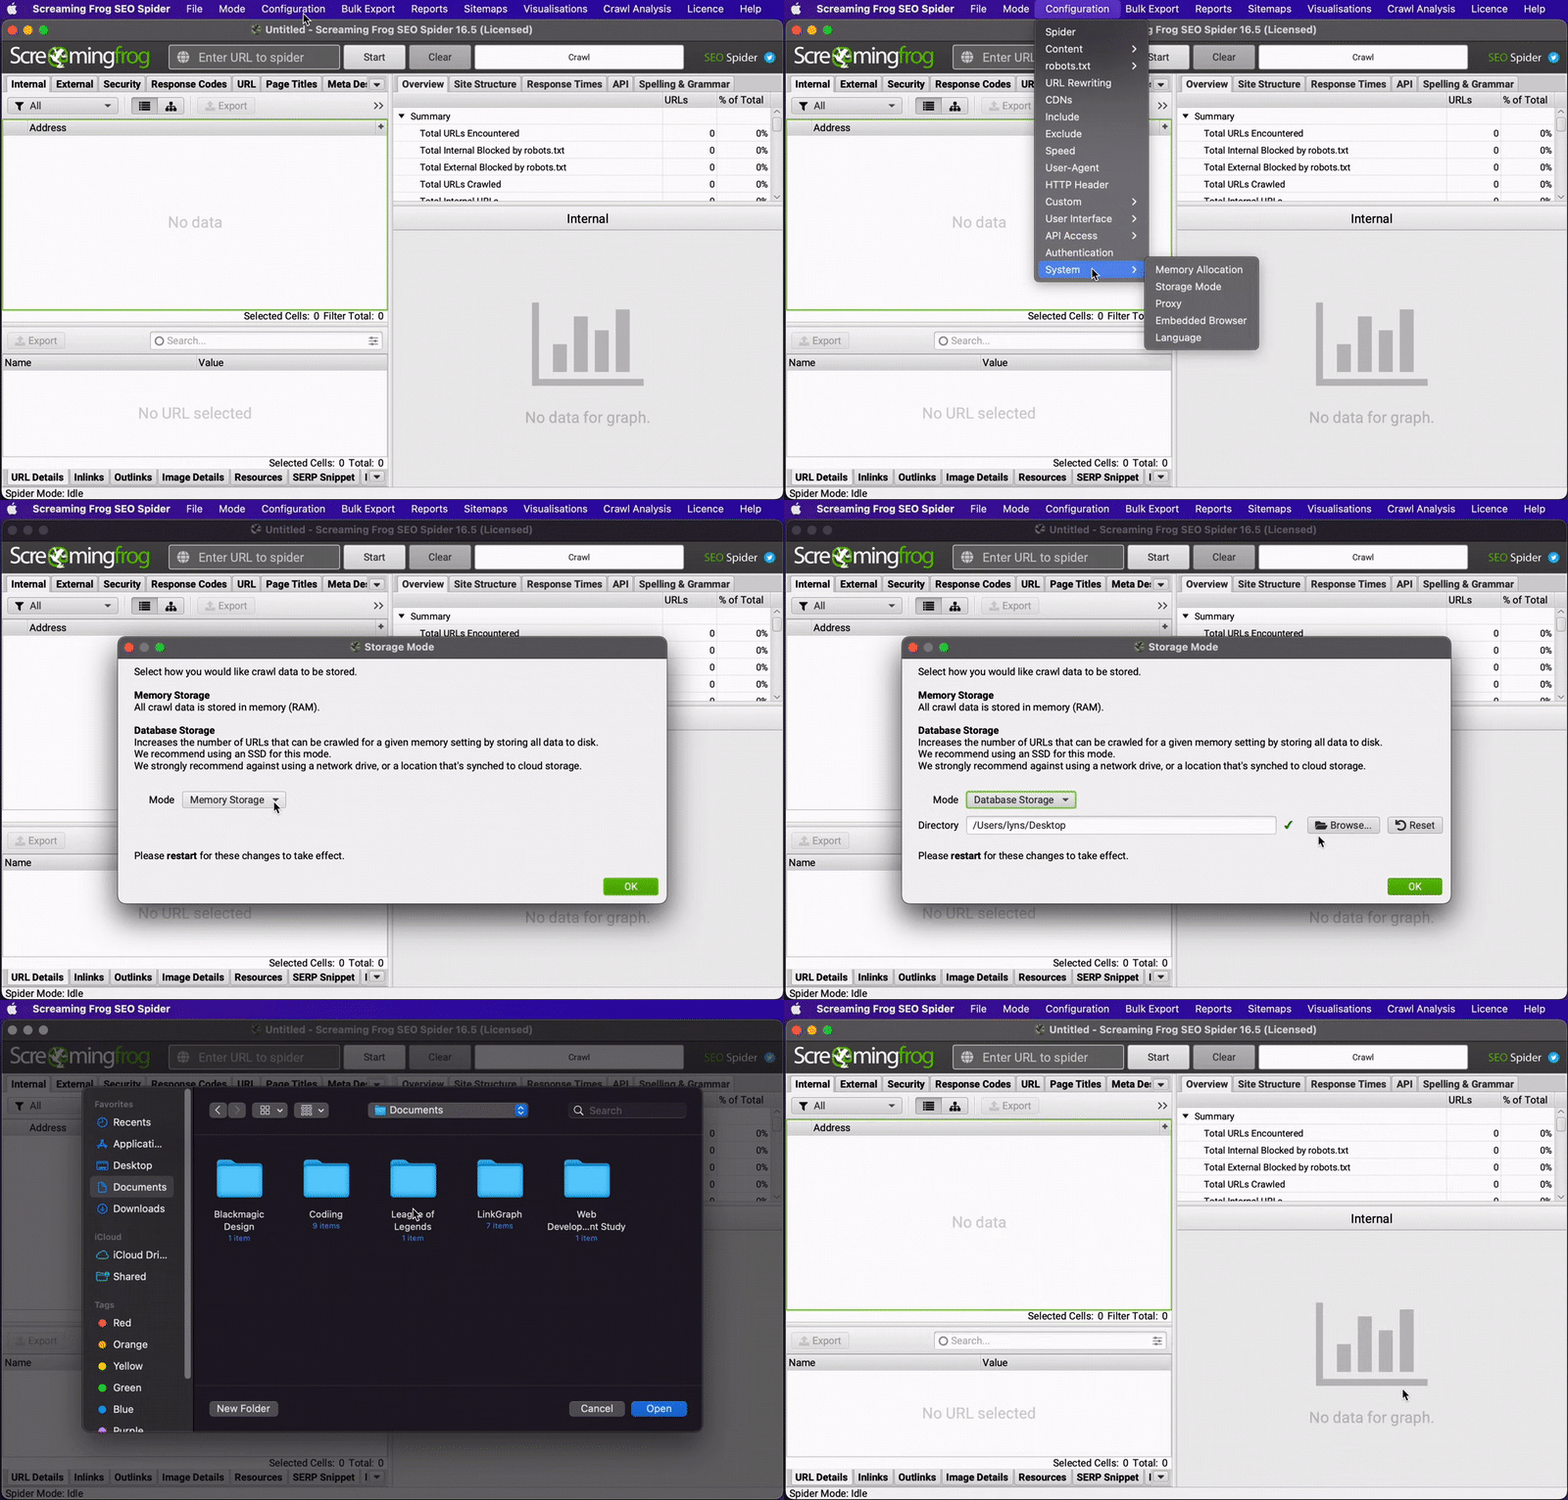
However, switching to database storage is super easy and, as long as your machine uses an SSD (solid state drive), just as fast. Go to Configuration > System > Storage Mode and change to Database Storage mode from the dropdown menu to make the switch. You can also change the path where you want the data to be stored.
2. Use the Request Data API Function to Get Retroactive Data From Analytics, Search Console, and SEO Tools
Connecting Google Analytics, Search Console, Moz, Ahrefs, PageSpeed Insights, or any other data source will give you additional insights when performing a site audit – plus, it saves you a lot of time.
However, it’s very common to gain access to these tools after performing the initial crawl or simply forget to link them to Screaming Frog.
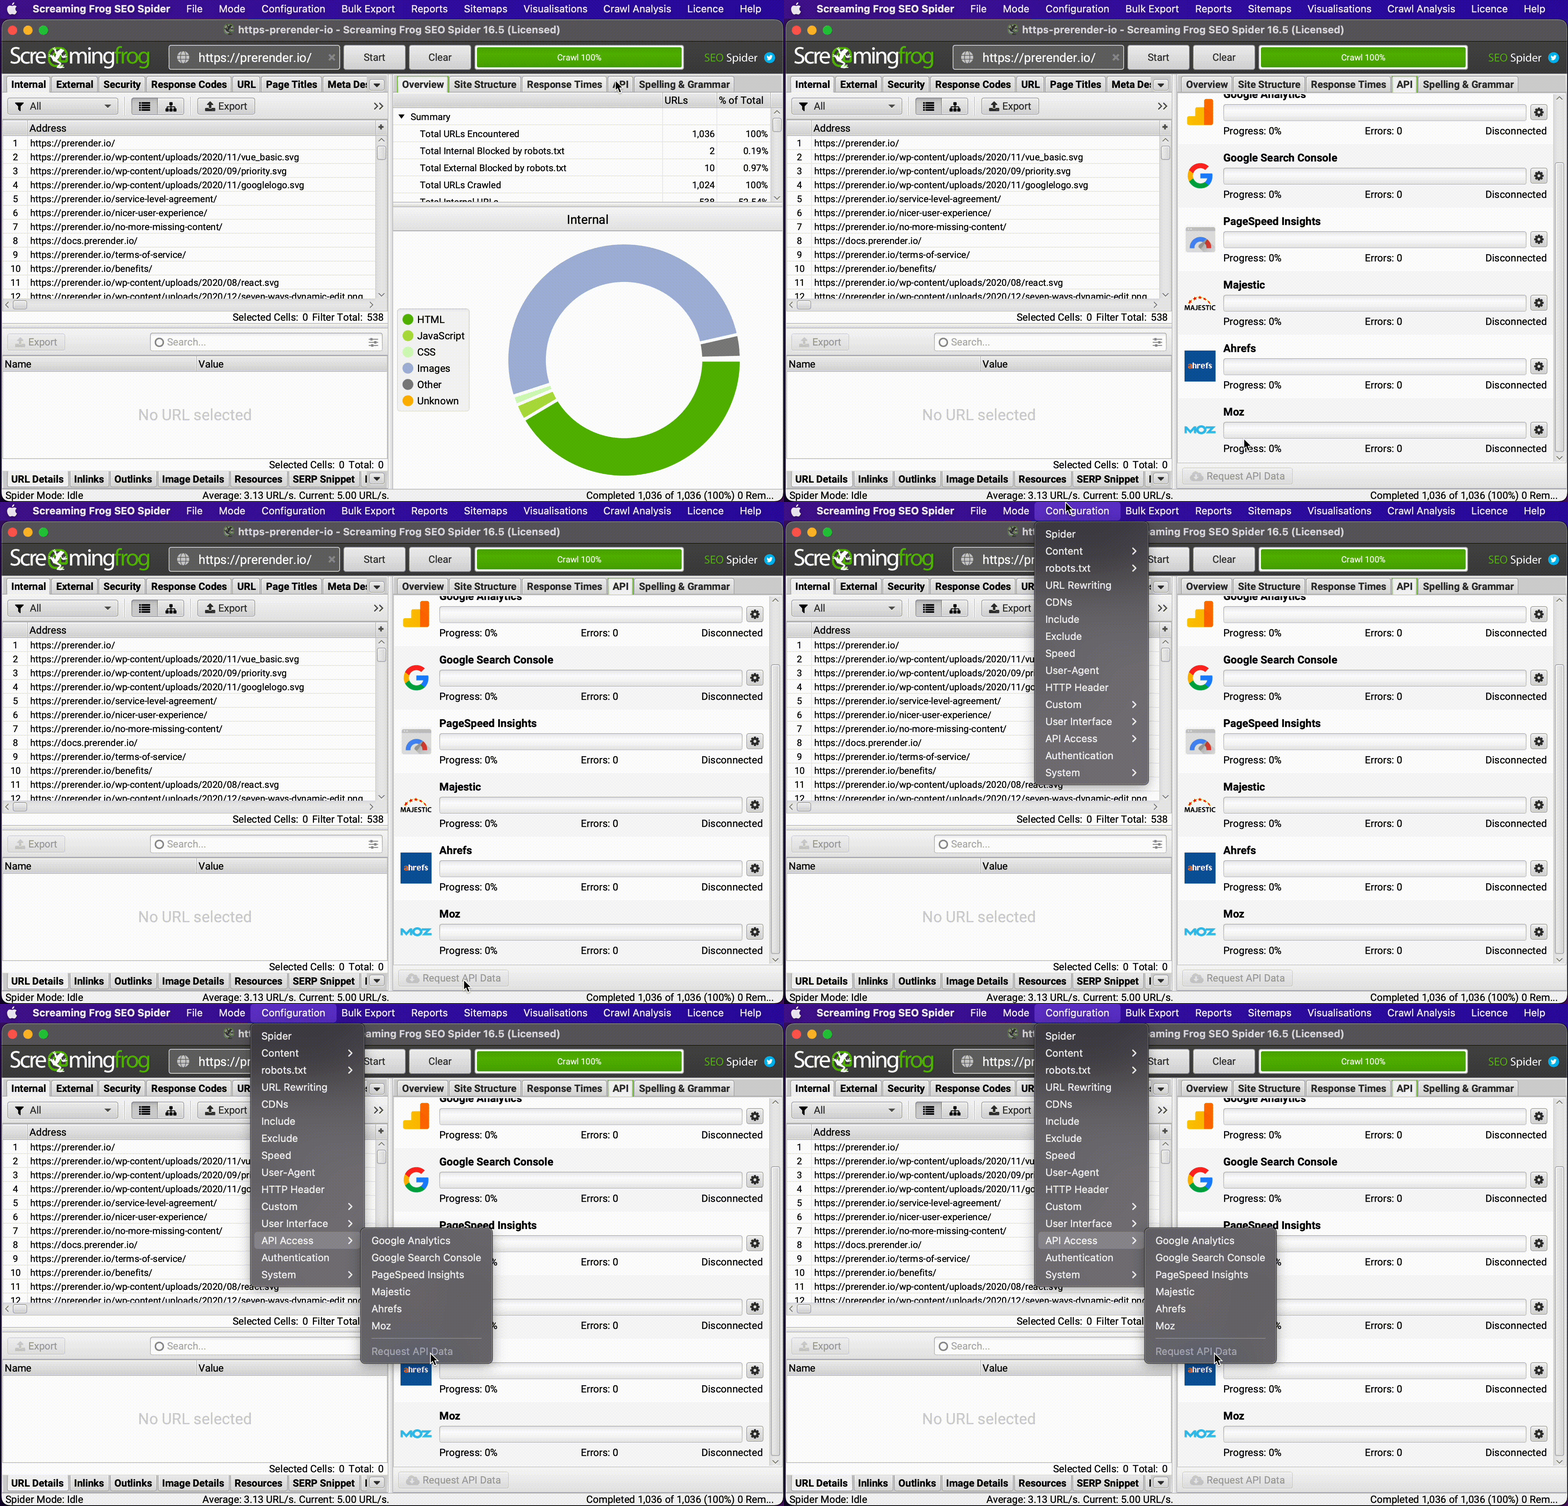
For those cases, Screaming Frog actually has a “Request API Data” button that allows you to pull data from APIs and then match them to the corresponding URL in the current crawl.
3. Audit Redirects During and After Site Migrations
When performing a site or domain migration, one of the most time-consuming and delicate tasks is verifying that every URL has been redirected correctly to the new location. A pure verification could mean hundreds of missing pages, 404 issues, broken internal links, and more.
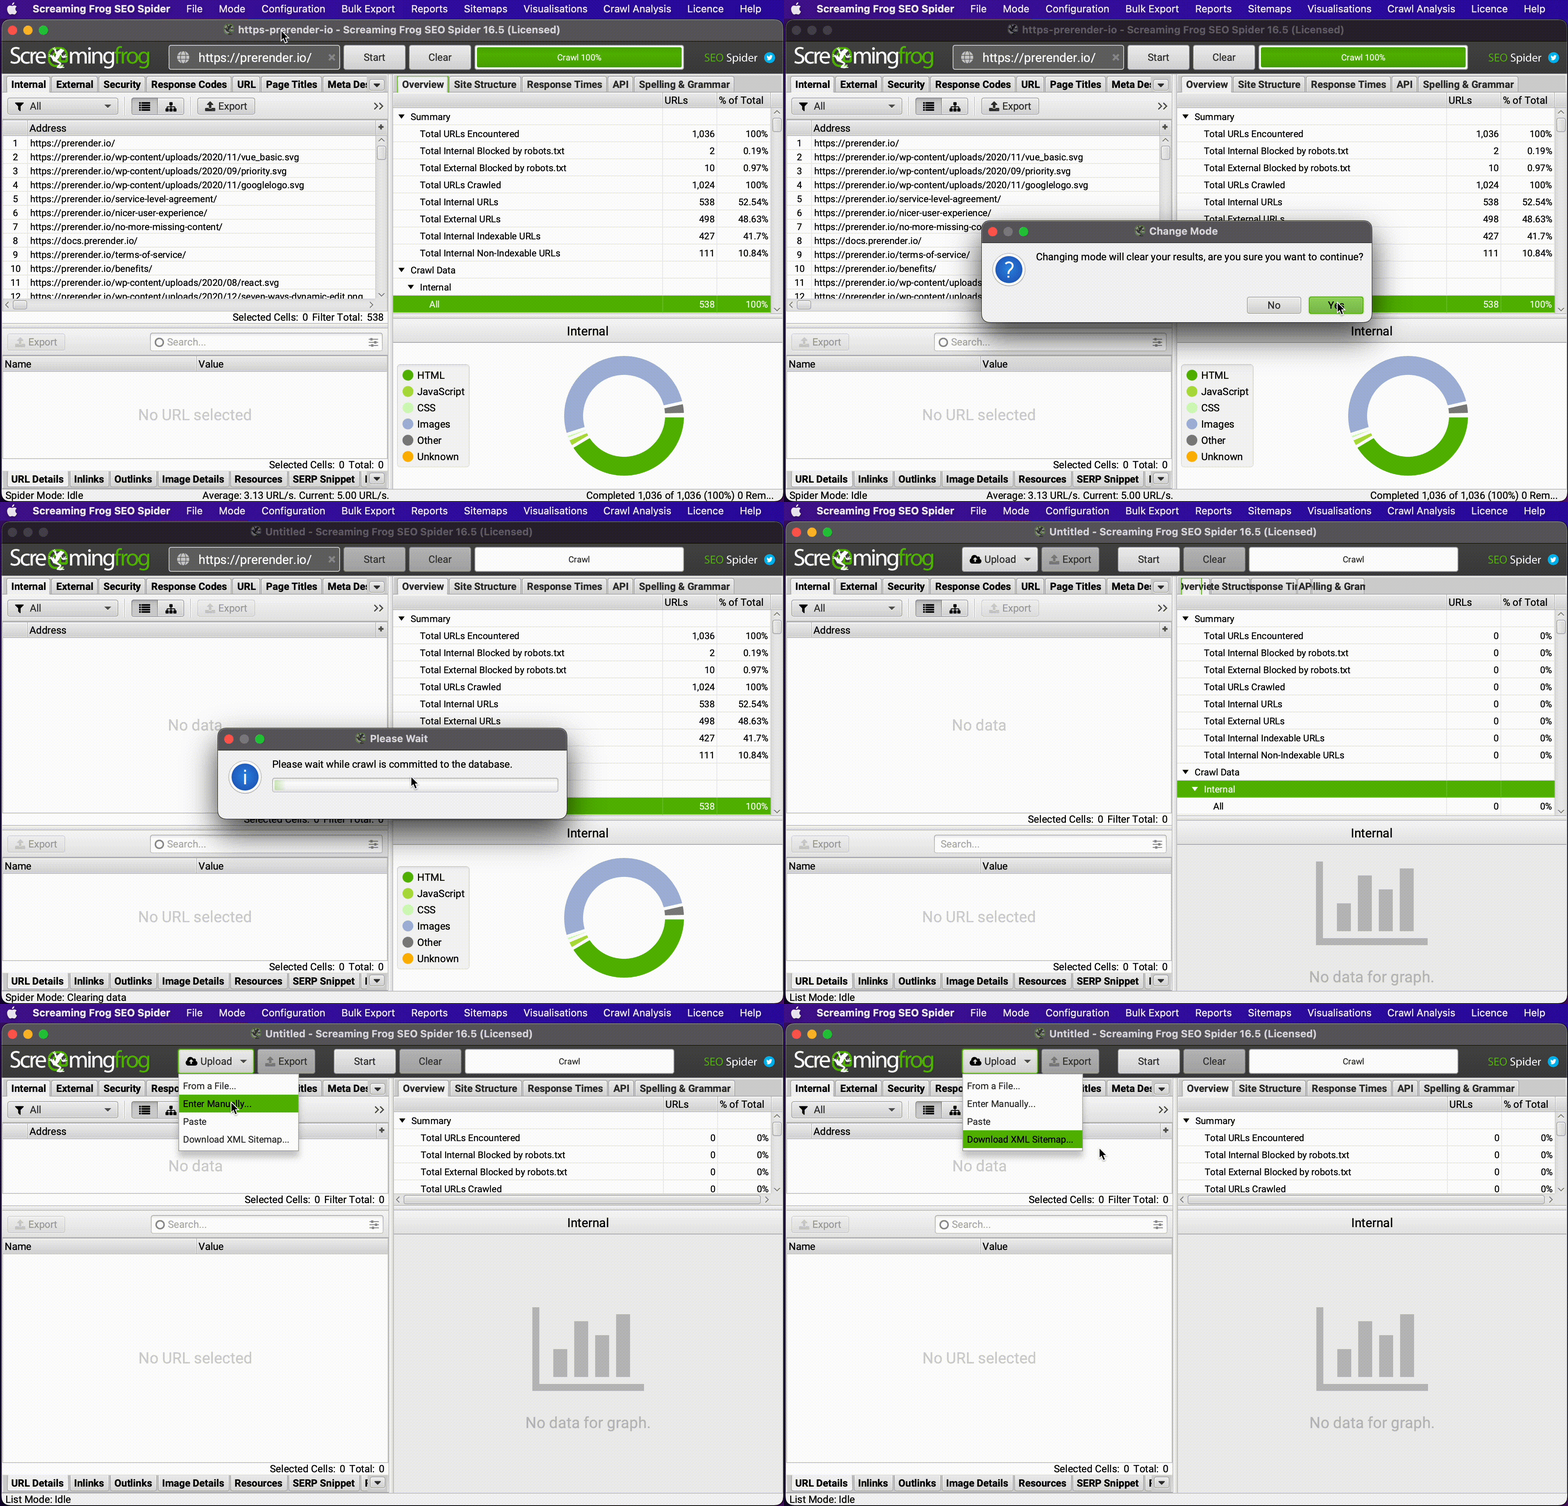
However, doing it manually can be tedious, or even impossible, when dealing with millions of URLs. To automate this process as much as possible, you can use the list mode to upload a list of the old URLs and follow the redirect chain.
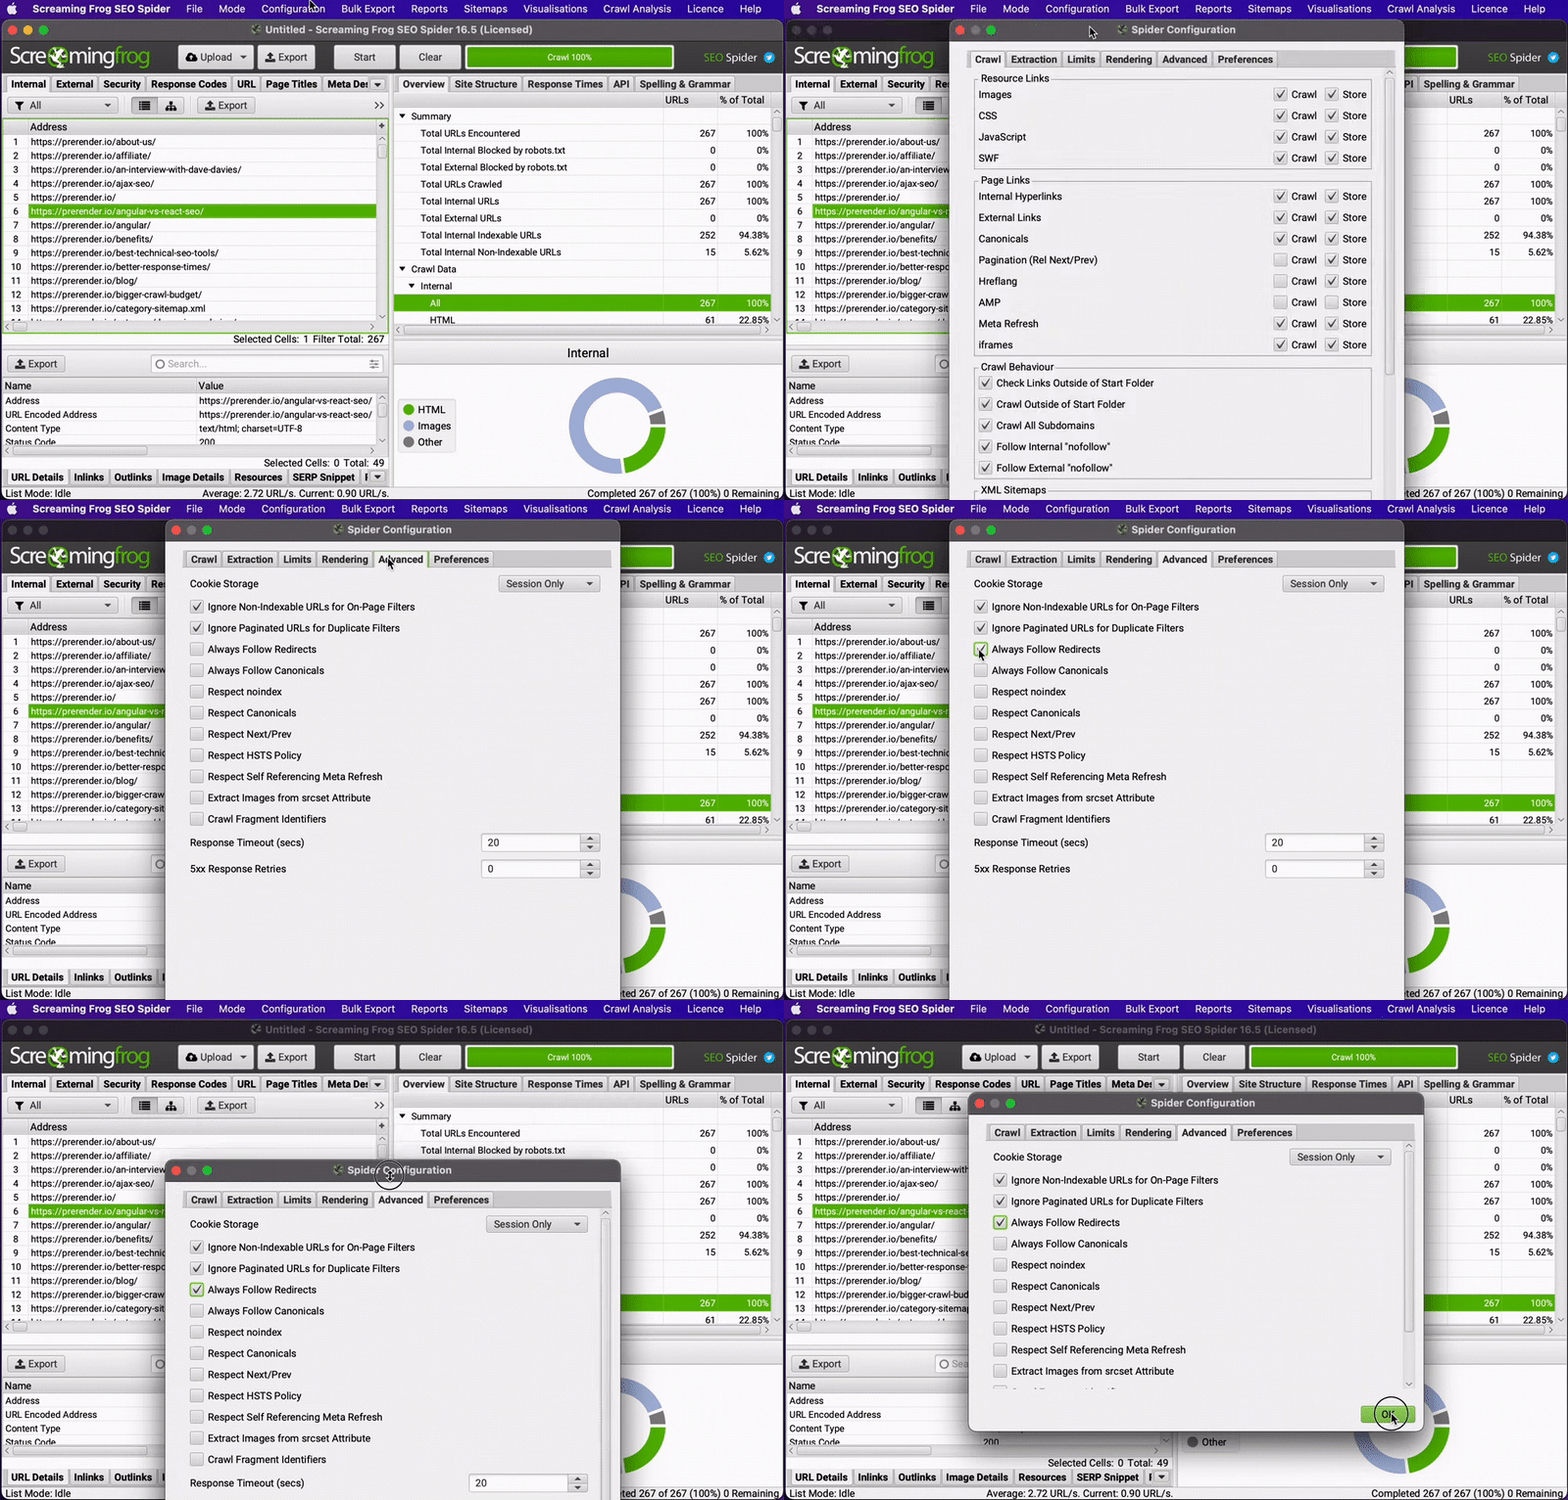
For this to work, tick the “always follow redirects” box.
Another way to go about it is to upload the list of old URLs after the migration and look for any other response code different from 301. Any URL returning a 404, for example, is still in need of a redirect.
4. Create and Debug Sitemaps in Screaming Frog
Screaming Frog (SF) makes dealing with sitemaps faster and more efficient by allowing the automation of otherwise time-consuming, manual tasks.
A common technical SEO issue for non-techy businesses is a lack of sitemap. This XML file helps Google and other search engines discover new pages – even if they’re orphans – and provide additional information like hreflang tags and relations between pages.
To create a new sitemap, crawl the website you’re working on (in spider mode) and then go to Sitemaps > XML Sitemap and tick the pages you want to include in the XML file. If the pages already have hreflang data, then Screaming Frog will add these links to the XML file.
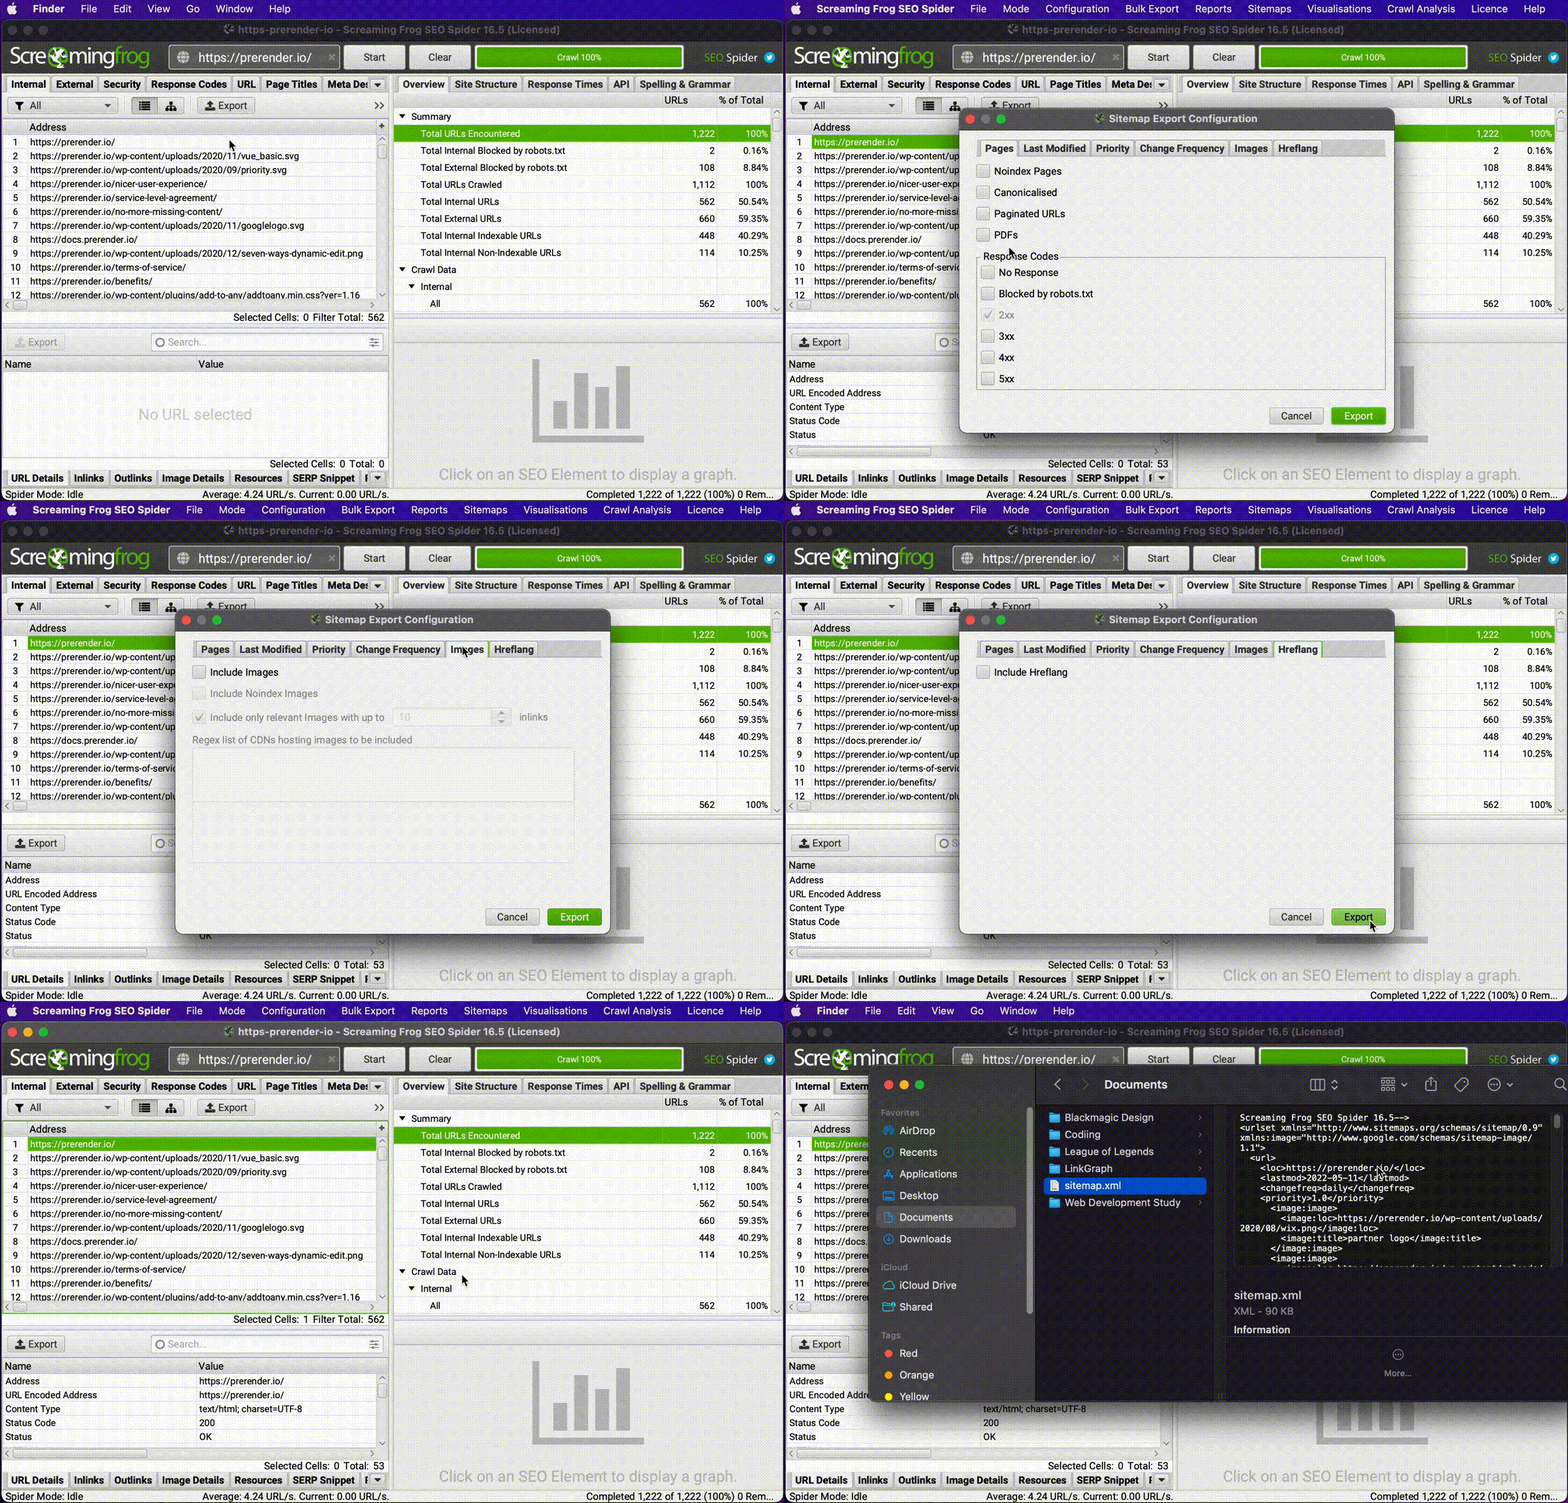
By default, SF adds only pages returning a 2xx response. Still, you can add or exclude pages based on status code, index status, canonical, pagination, PDF files, last modified, etc.
Although you’ll want to double check the resulting file, it’s a great starting point. And, for small websites, the raw file created by Screaming Frog will be enough.
But what if there’s already an existing sitemap, and you need to ensure that it’s implemented correctly? In those cases, you can switch Screaming Frog to list mode and upload the sitemap.xml URL of our target site for a crawl.
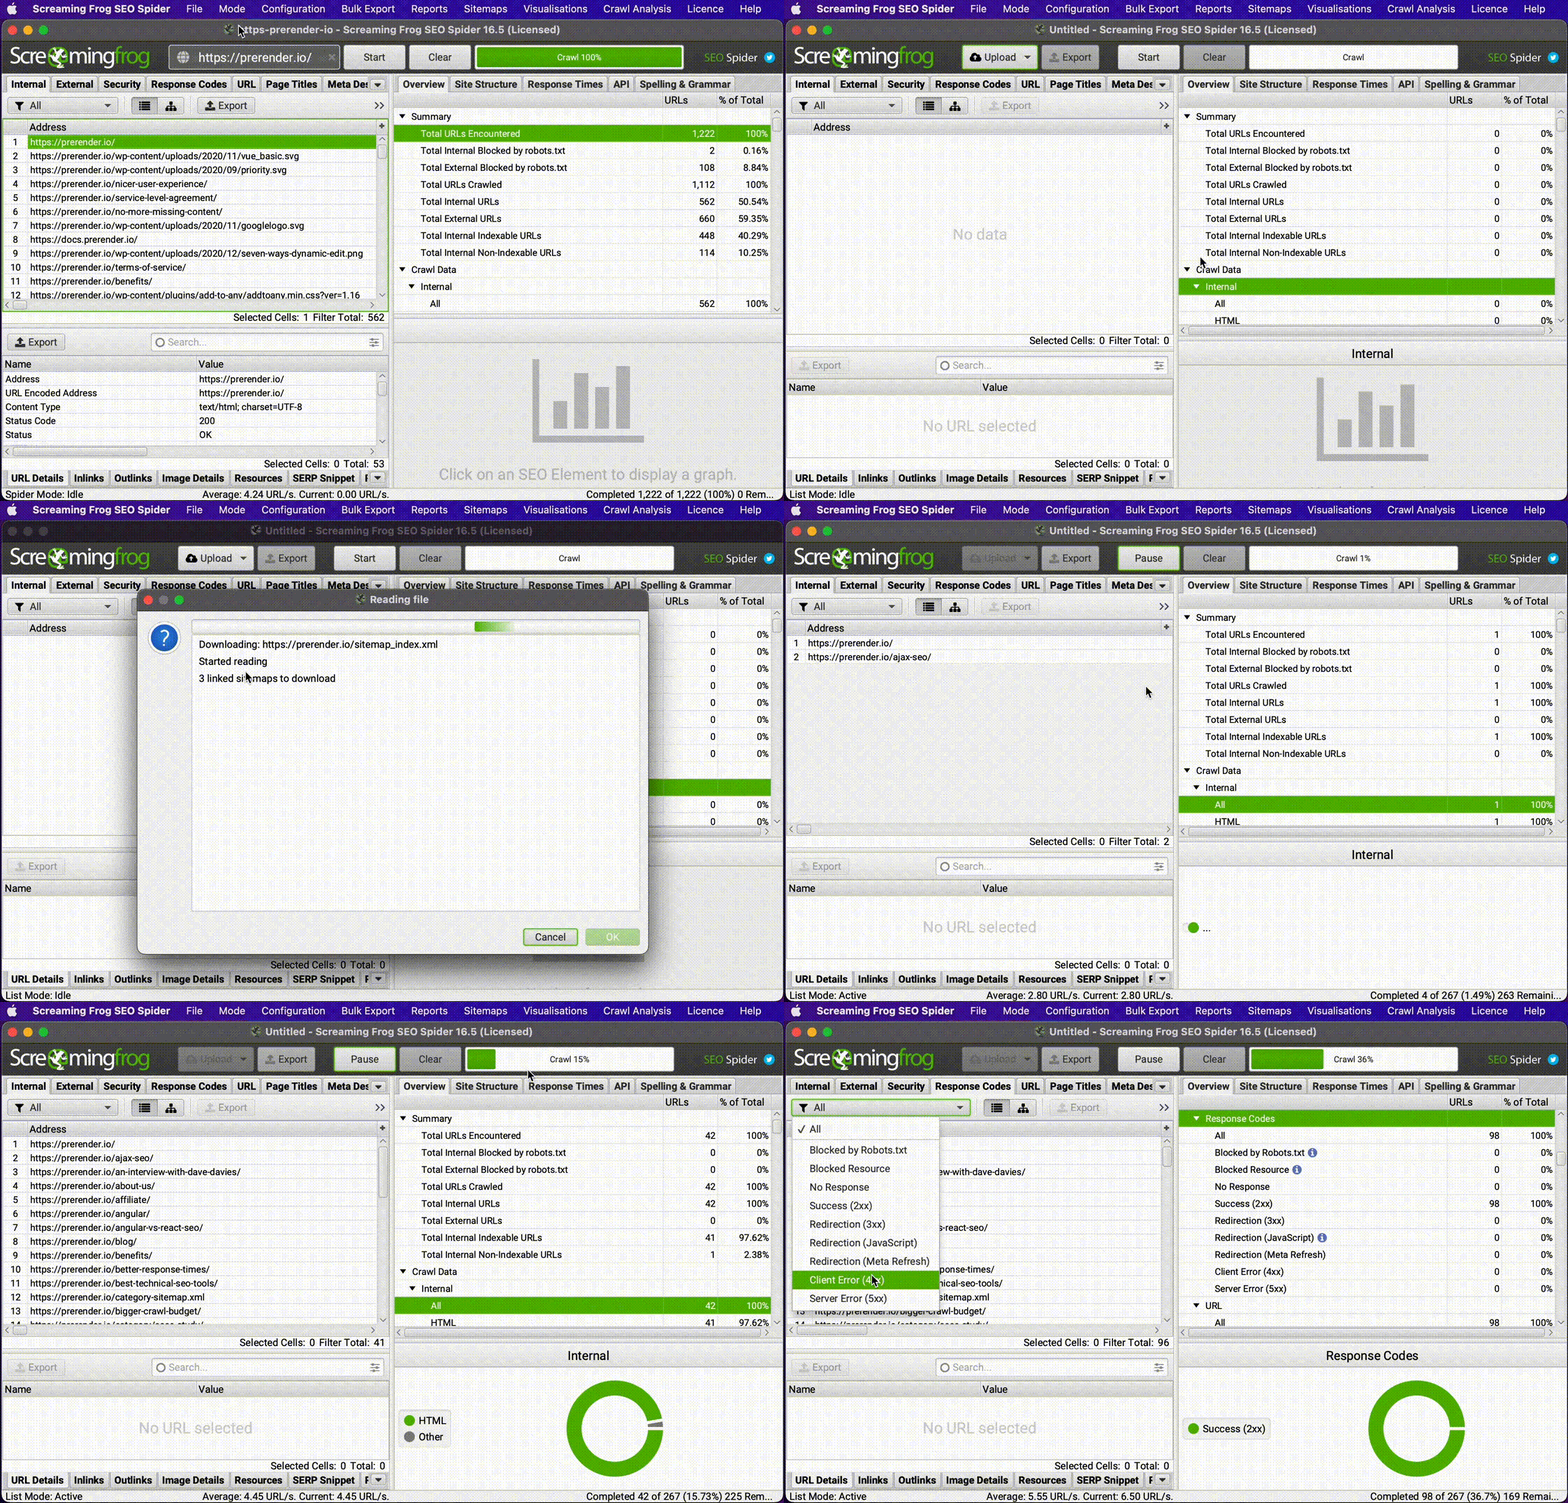
The same can be done if you’re working on a sitemap manually and want to double-check for redirects, broken links, and more.
5. Find Broken and Redirecting Internal Links
In many cases, cleaning and optimizing your internal links can be a great quick win for your SEO campaign. However, there’s a lot of crawl data that can be distracting.
To help you focus on this task, simply go to Configuration > Spider and untick images, CSS, JavaScript, and any other file that won’t include any internal link. This is mainly to save processing power and make the crawl faster.
To go a step further, you can even limit the data extracted from the URLs, but it shouldn’t be necessary unless you’re working with a massive amount of URLs.
Then, crawl the website in spider mode and sort the internal tab by status code. Click on any specific URL to access the Internal Tab on the window below. You’ll now be able to select a URL and check the links pointing to it as well as the anchor text in the InLinks tab in the window below.
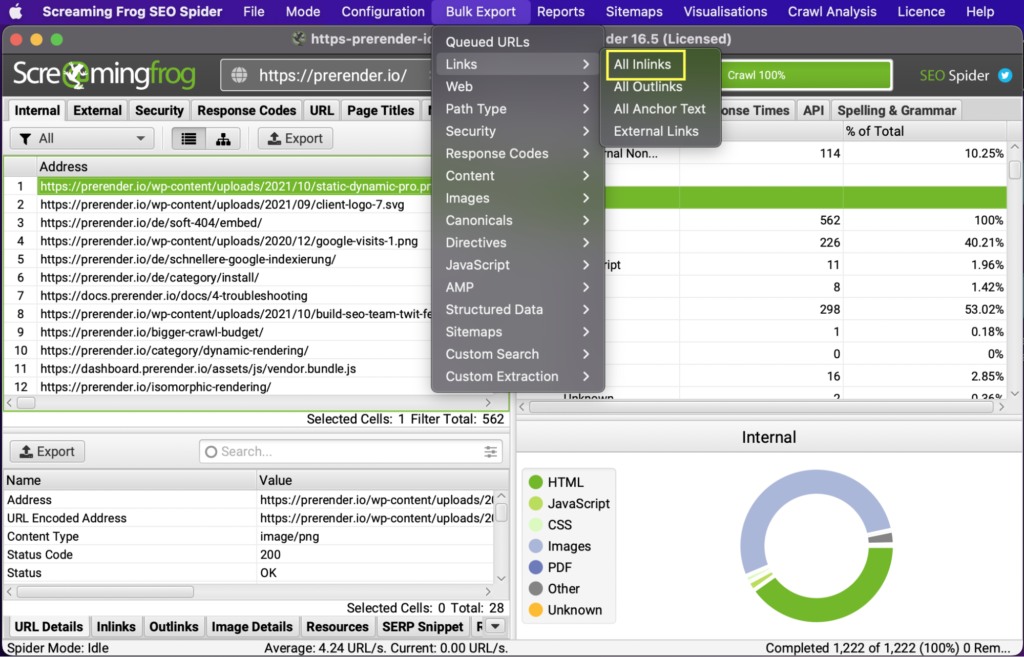
Finally, export all the internal links with issues by going to Bulk Report > Response Codes and exporting:
- Redirection (3xx) Inlinks
- Client Error (4xx) Inlinks
- Server Error (5xx) Inlinks
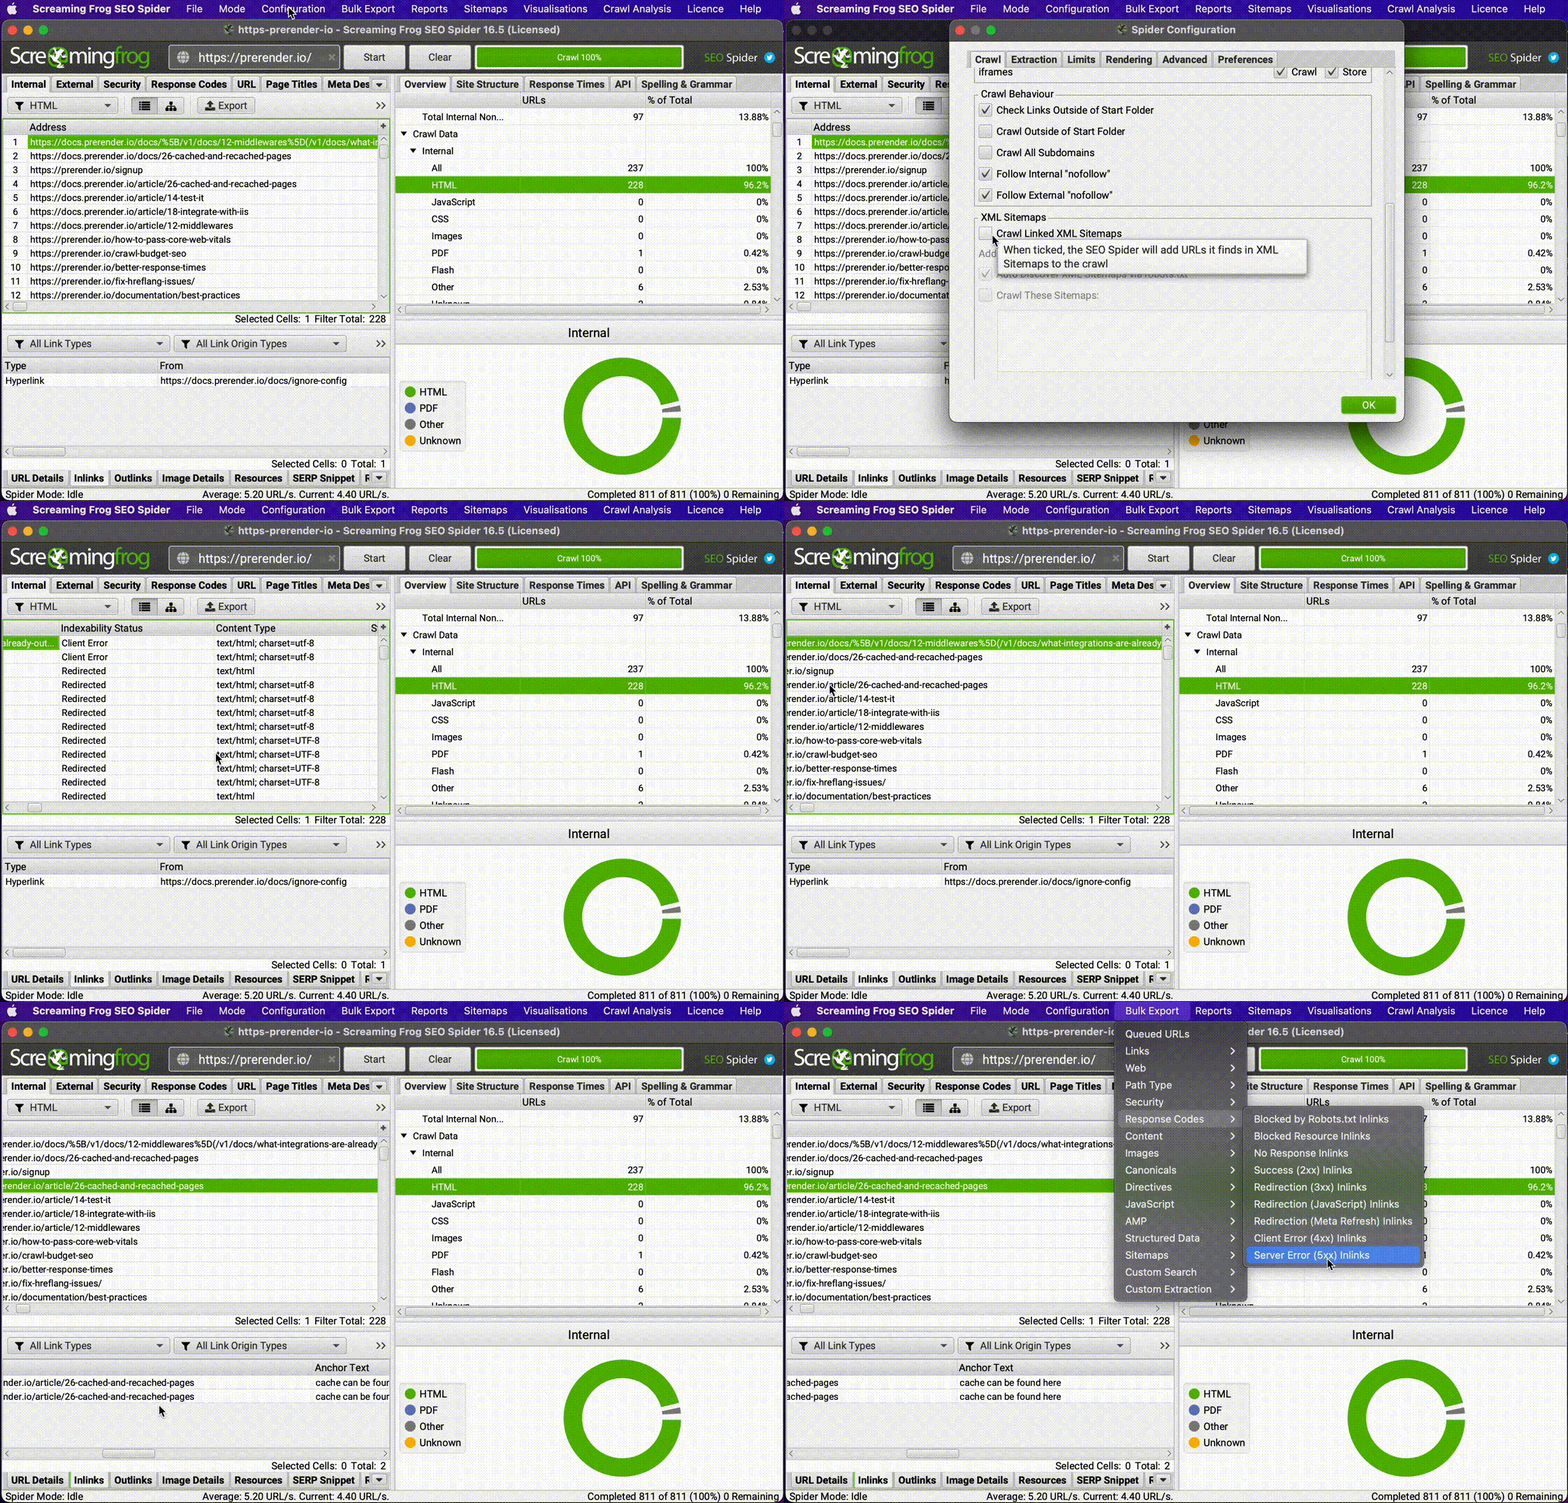
You can also export the complete list on InLinks and later filter the non-200 response codes.
6. Exclude or Include Subdirectories or Subdomains to Limit Your Crawl
When working with a large website, you will likely want to crawl the entire site to look for issues. However, this can be really stressful for you and your machine when you see the tremendous amount of data through which you’ll have to sort.
In these cases, it’s better to break the website down into smaller parts and only crawl those pages. You can use some RegEx expressions to tell Screaming Frog which subdirectories and subdomains you want to crawl, limiting your crawl to only a section at a time.
Let’s say that you want to work only with blog content, and it’s all inside the /blog/ subfolder. Go to Configuration > Include and then use the https://example.com/blog/.* wildcard expression, so SF knows to only crawl those URLs that match the beginning of the URL.
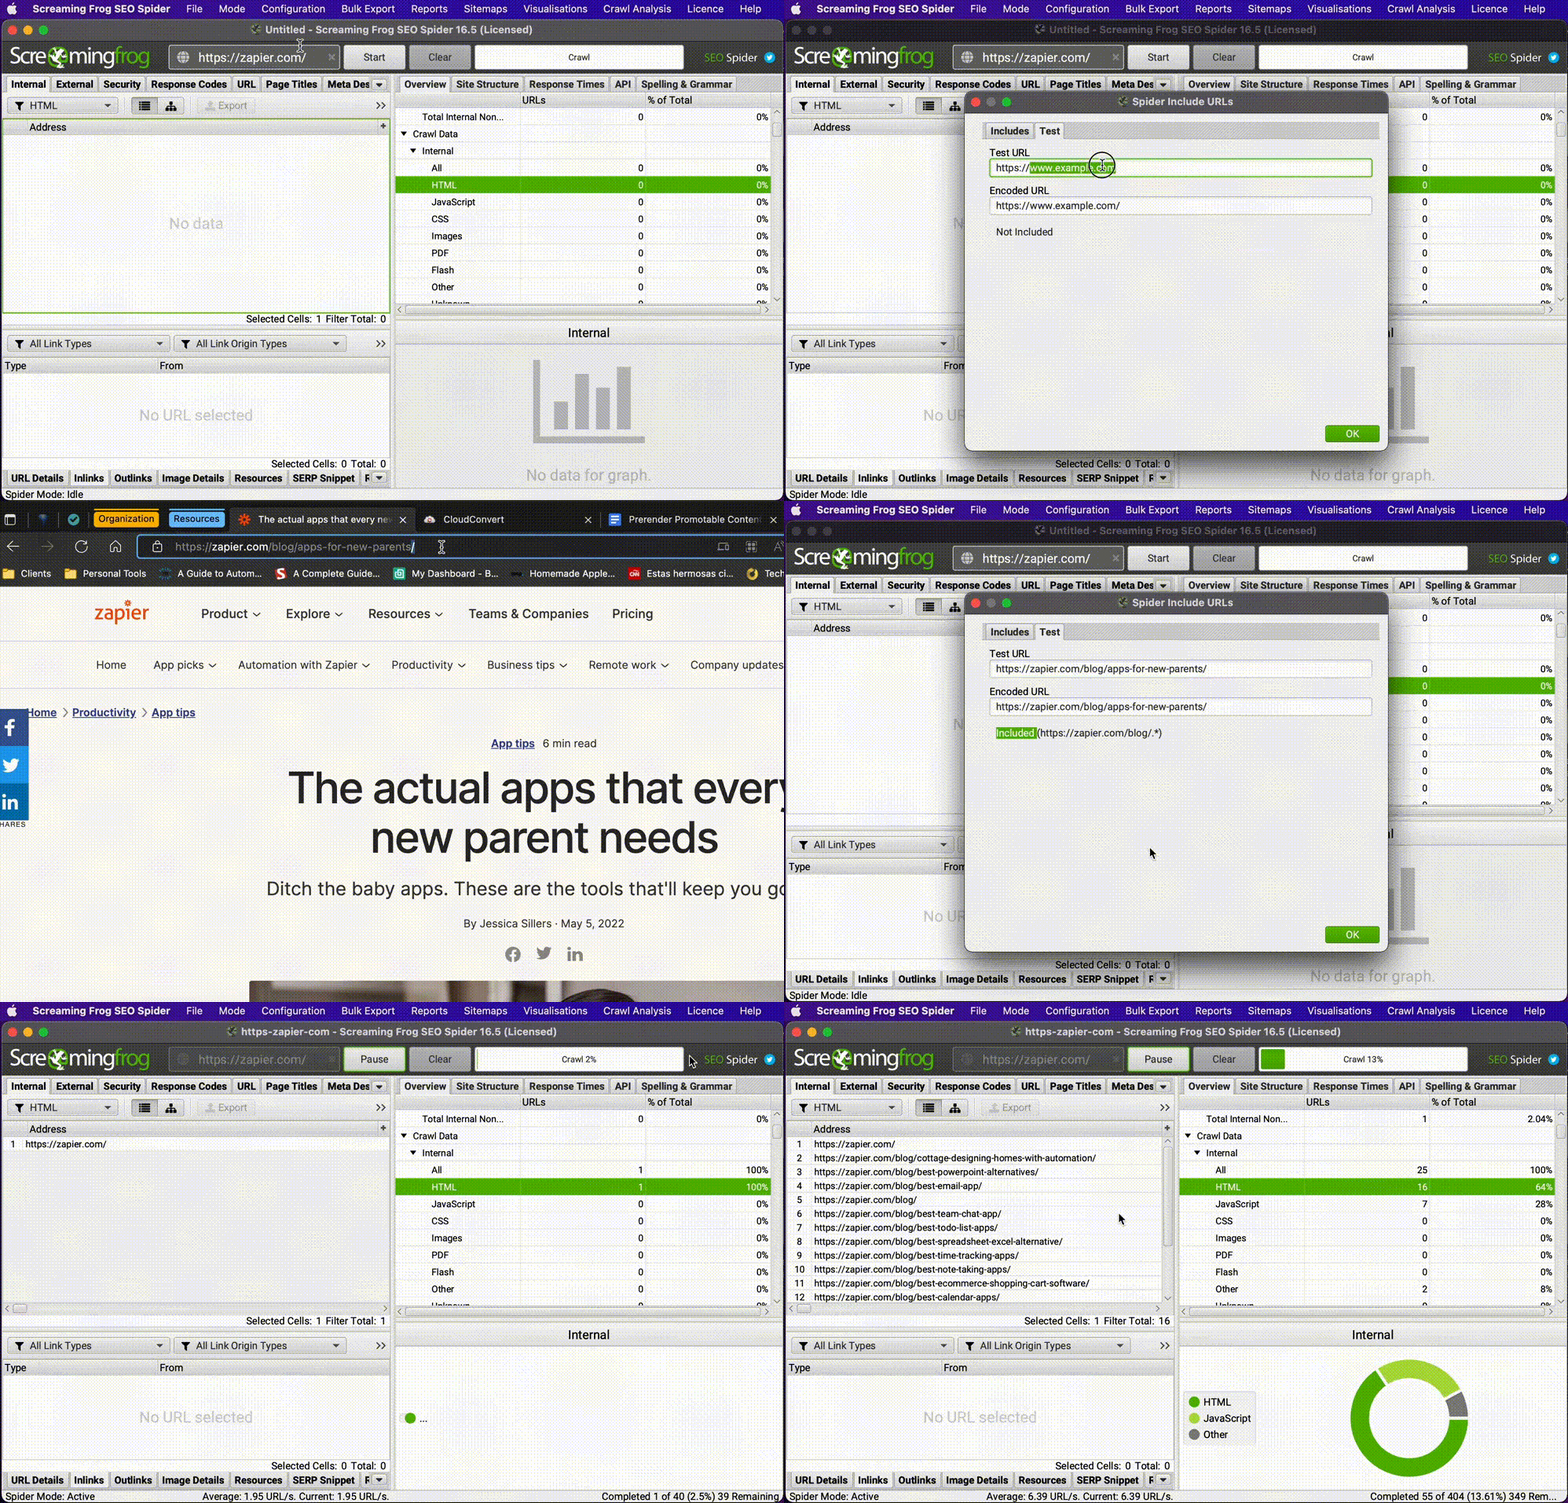
You can do the same thing with the Exclude function to crawl subdirectories that match your parameters.
7. Check Only “Clean” HTML Pages
If you want to optimize your pages’ metadata, create a list of URLs or perform any other task where all you need is the HTML pages, you can tell Screaming Frog to only crawl these pages and ignore different file types.
Go to Configuration > Spider, untick all boxes from the Resource Links section, and start the crawl as you usually would.
However, if you have a lot of URLs with parameters, you might want to go a little bit further and use a RegEx expression to exclude all parameters or a specific syntax like:
- \? to exclude all URLs with a question mark in them (the question mark needs to be backslashed for it to work)
- You can also exclude a specific parameter like a price filter by adding its syntax. For example \?price.
You can find more Exclude ideas on Screaming Frog’s configuration guide.
8. Audit Your Structured Data Within Screaming Frog
Screaming Frog can help you find structured data (SD) issues quickly by comparing your implementation against Google’s and Schema.org’s guidelines. Before starting your crawl, go to Configuration > Spider > Extraction > Structured Data and tick the format of your SD or all of them if you didn’t implement it originally.
After crawling your site, it will populate the Screaming Frog reports with the pages containing SD, pages missing structured data, and the pages with errors or warnings.
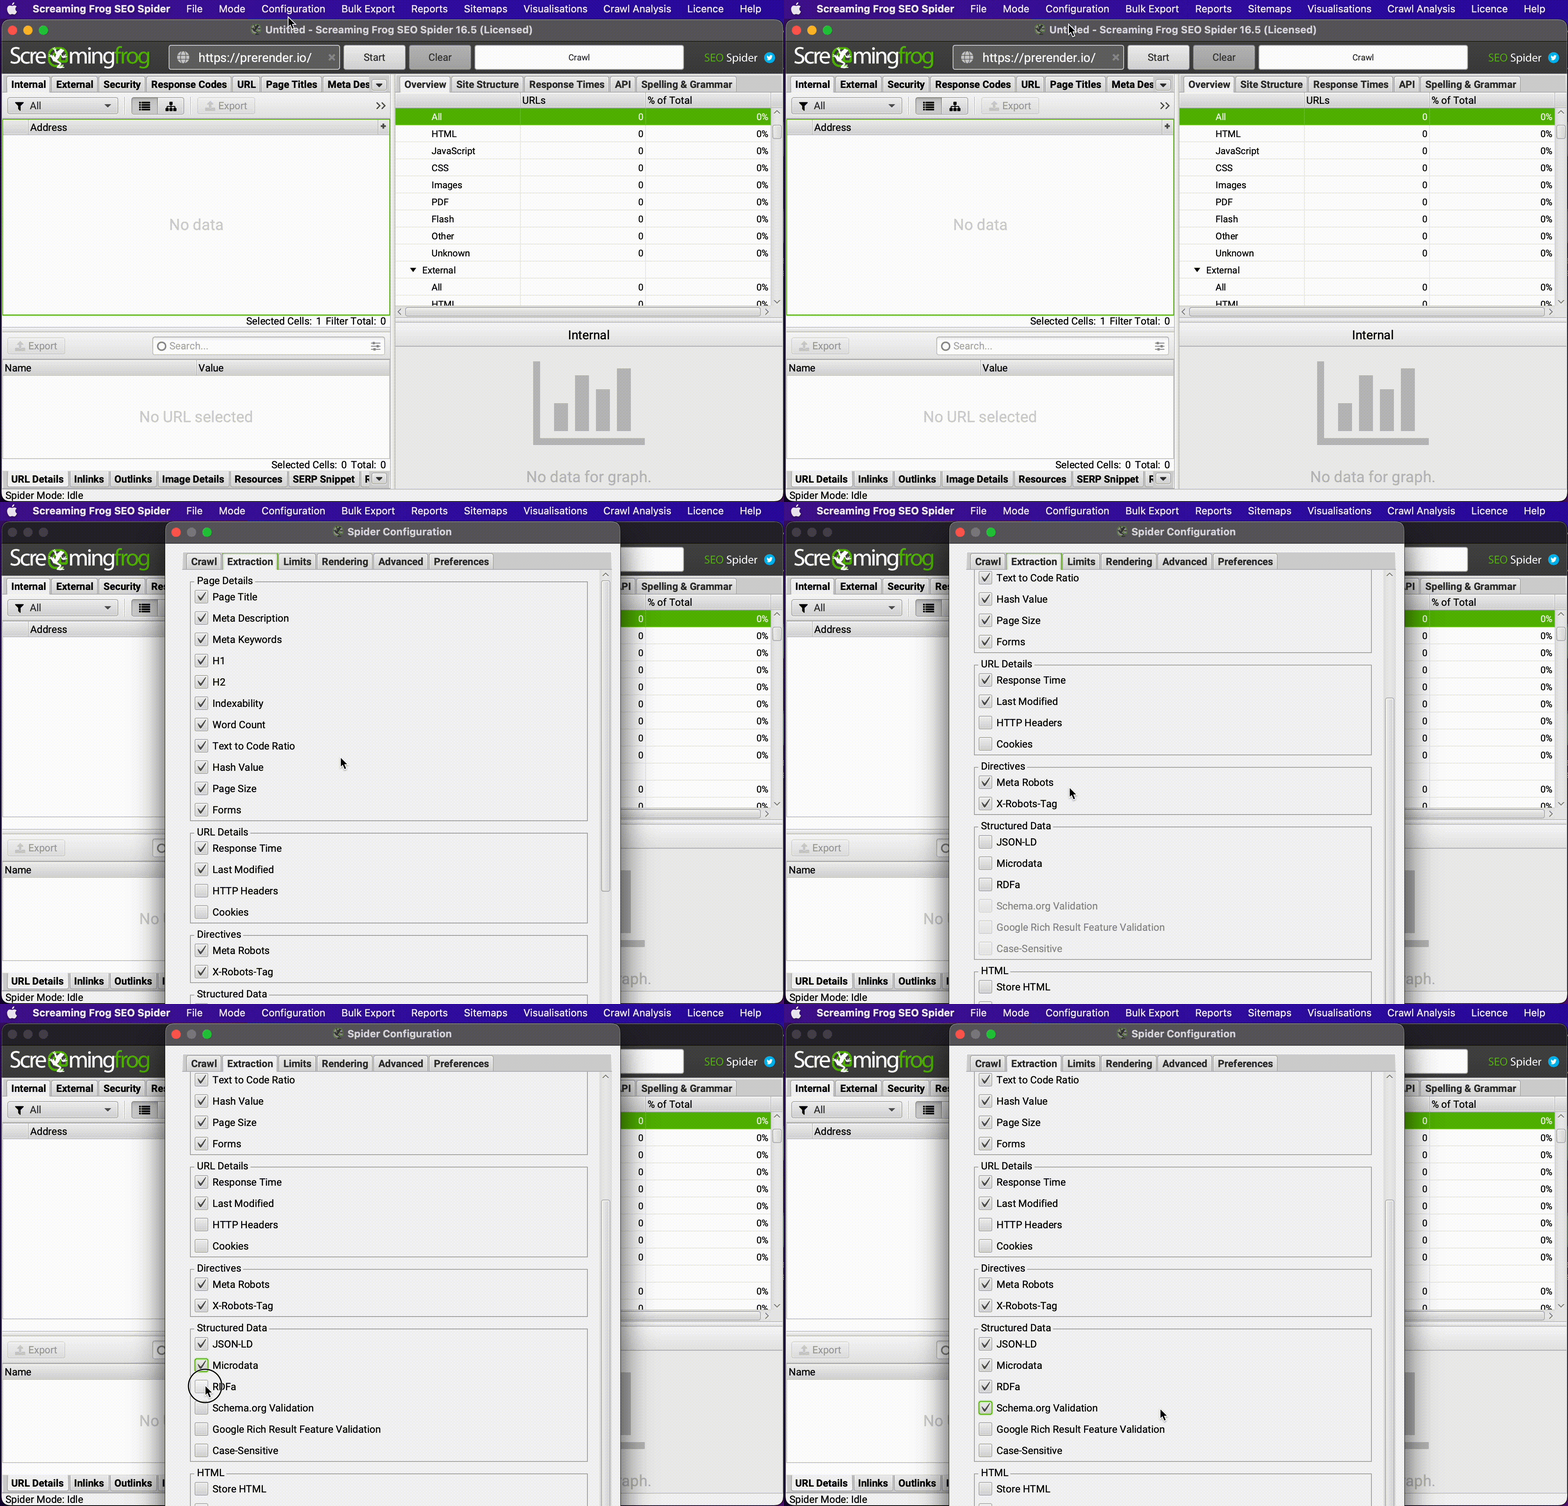
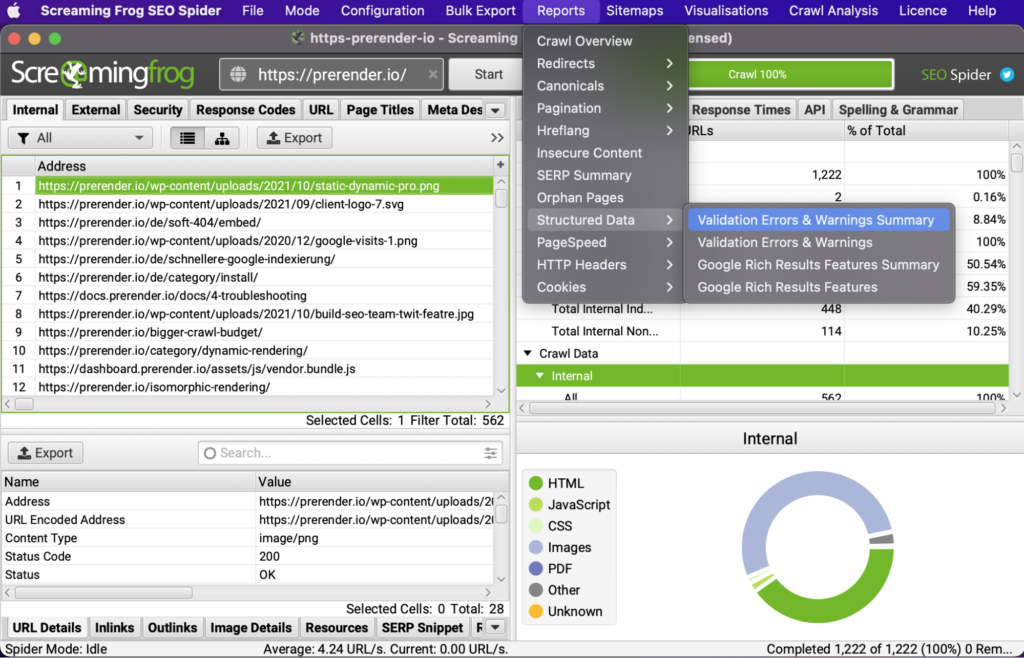
Finally, you can go to Reports > Structured Data and export all the validation errors and warnings.
9. Check for Crawlability Issues
Search engines need to be able to crawl, index and rank your pages in search results.
There are two main ways Screaming Frog can help check how search engines perceive your websites:
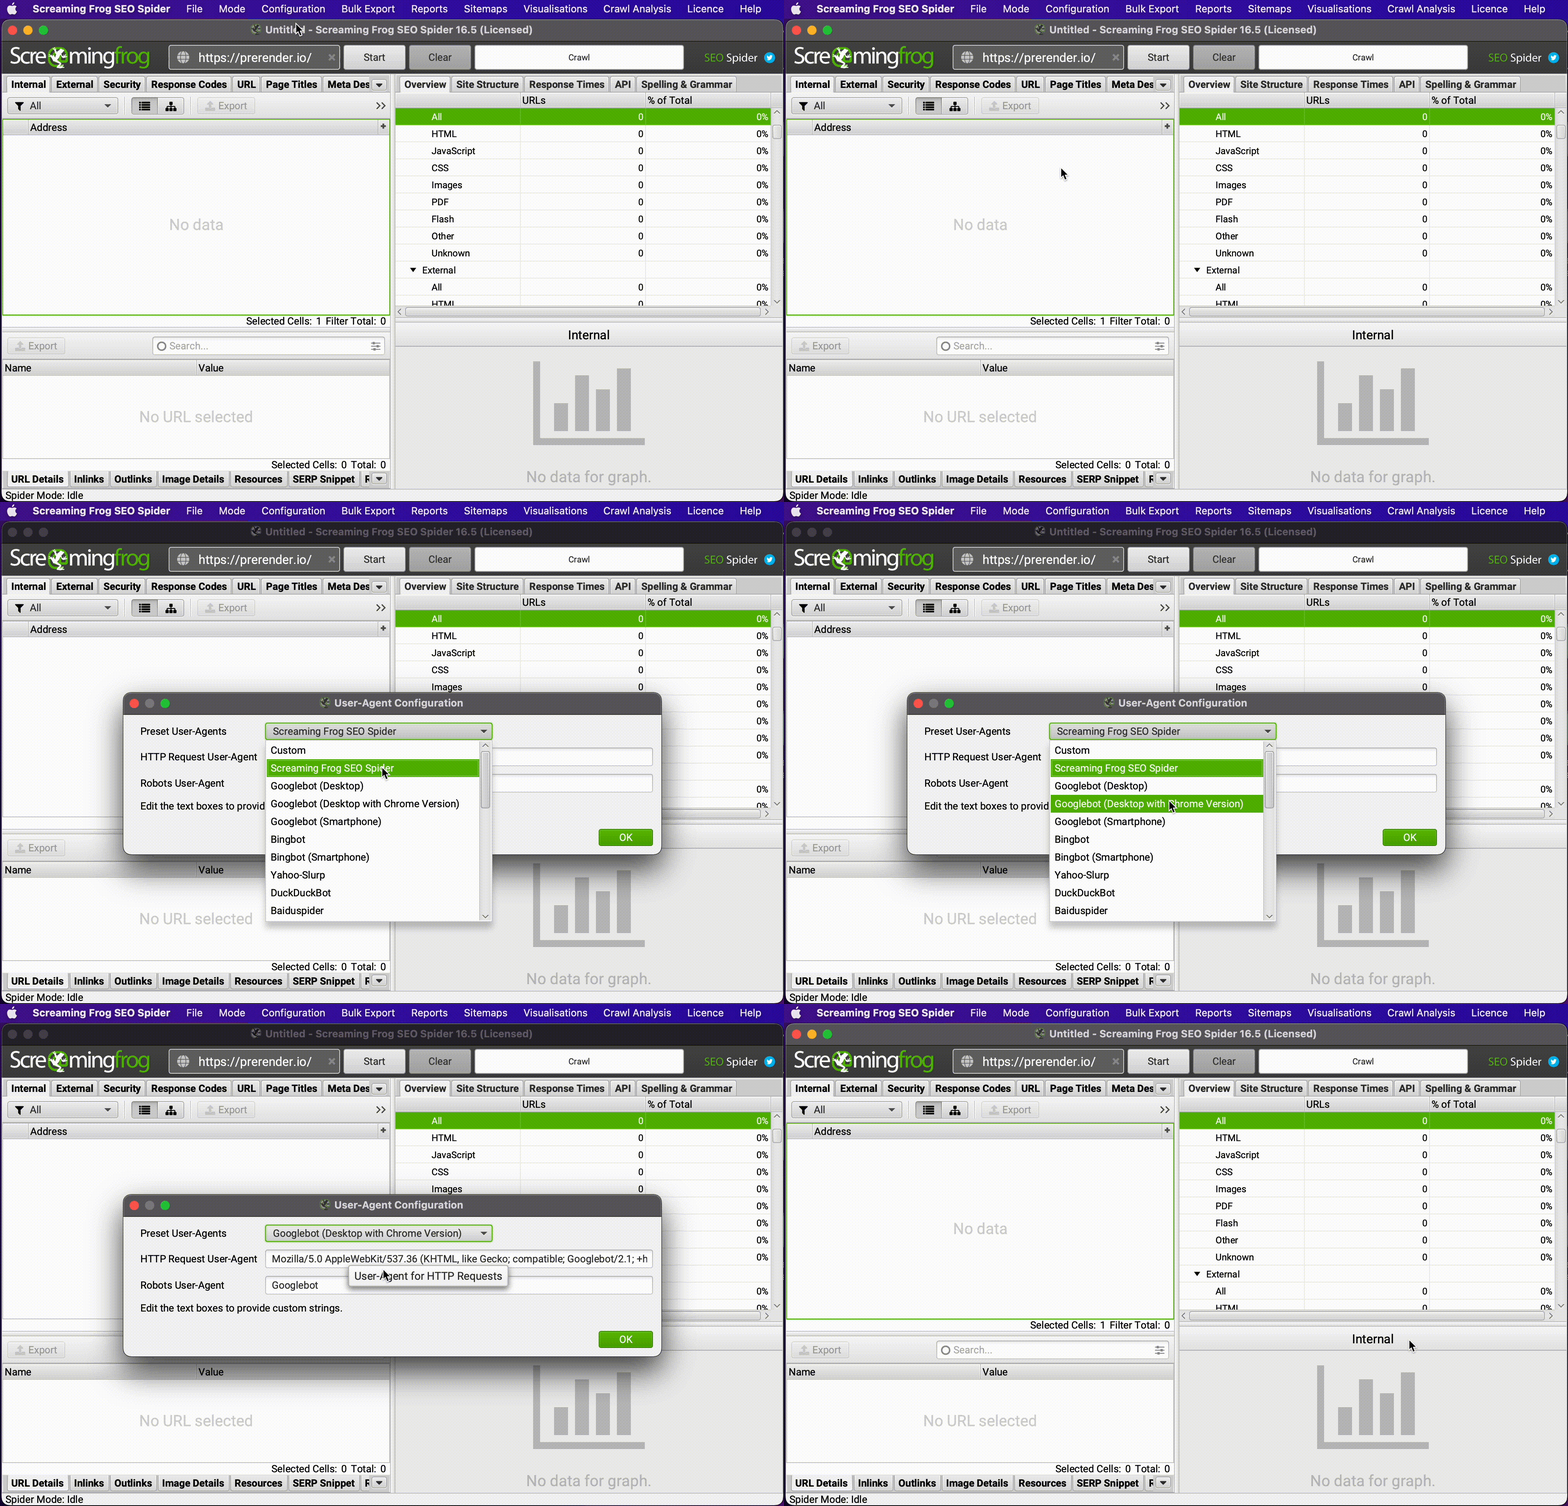
- Change the User-Agent from the Configuration > User Agent menu and pick the bot you want to mimic. For example, you can change it to the desktop version of Google and collect the data as Google does.
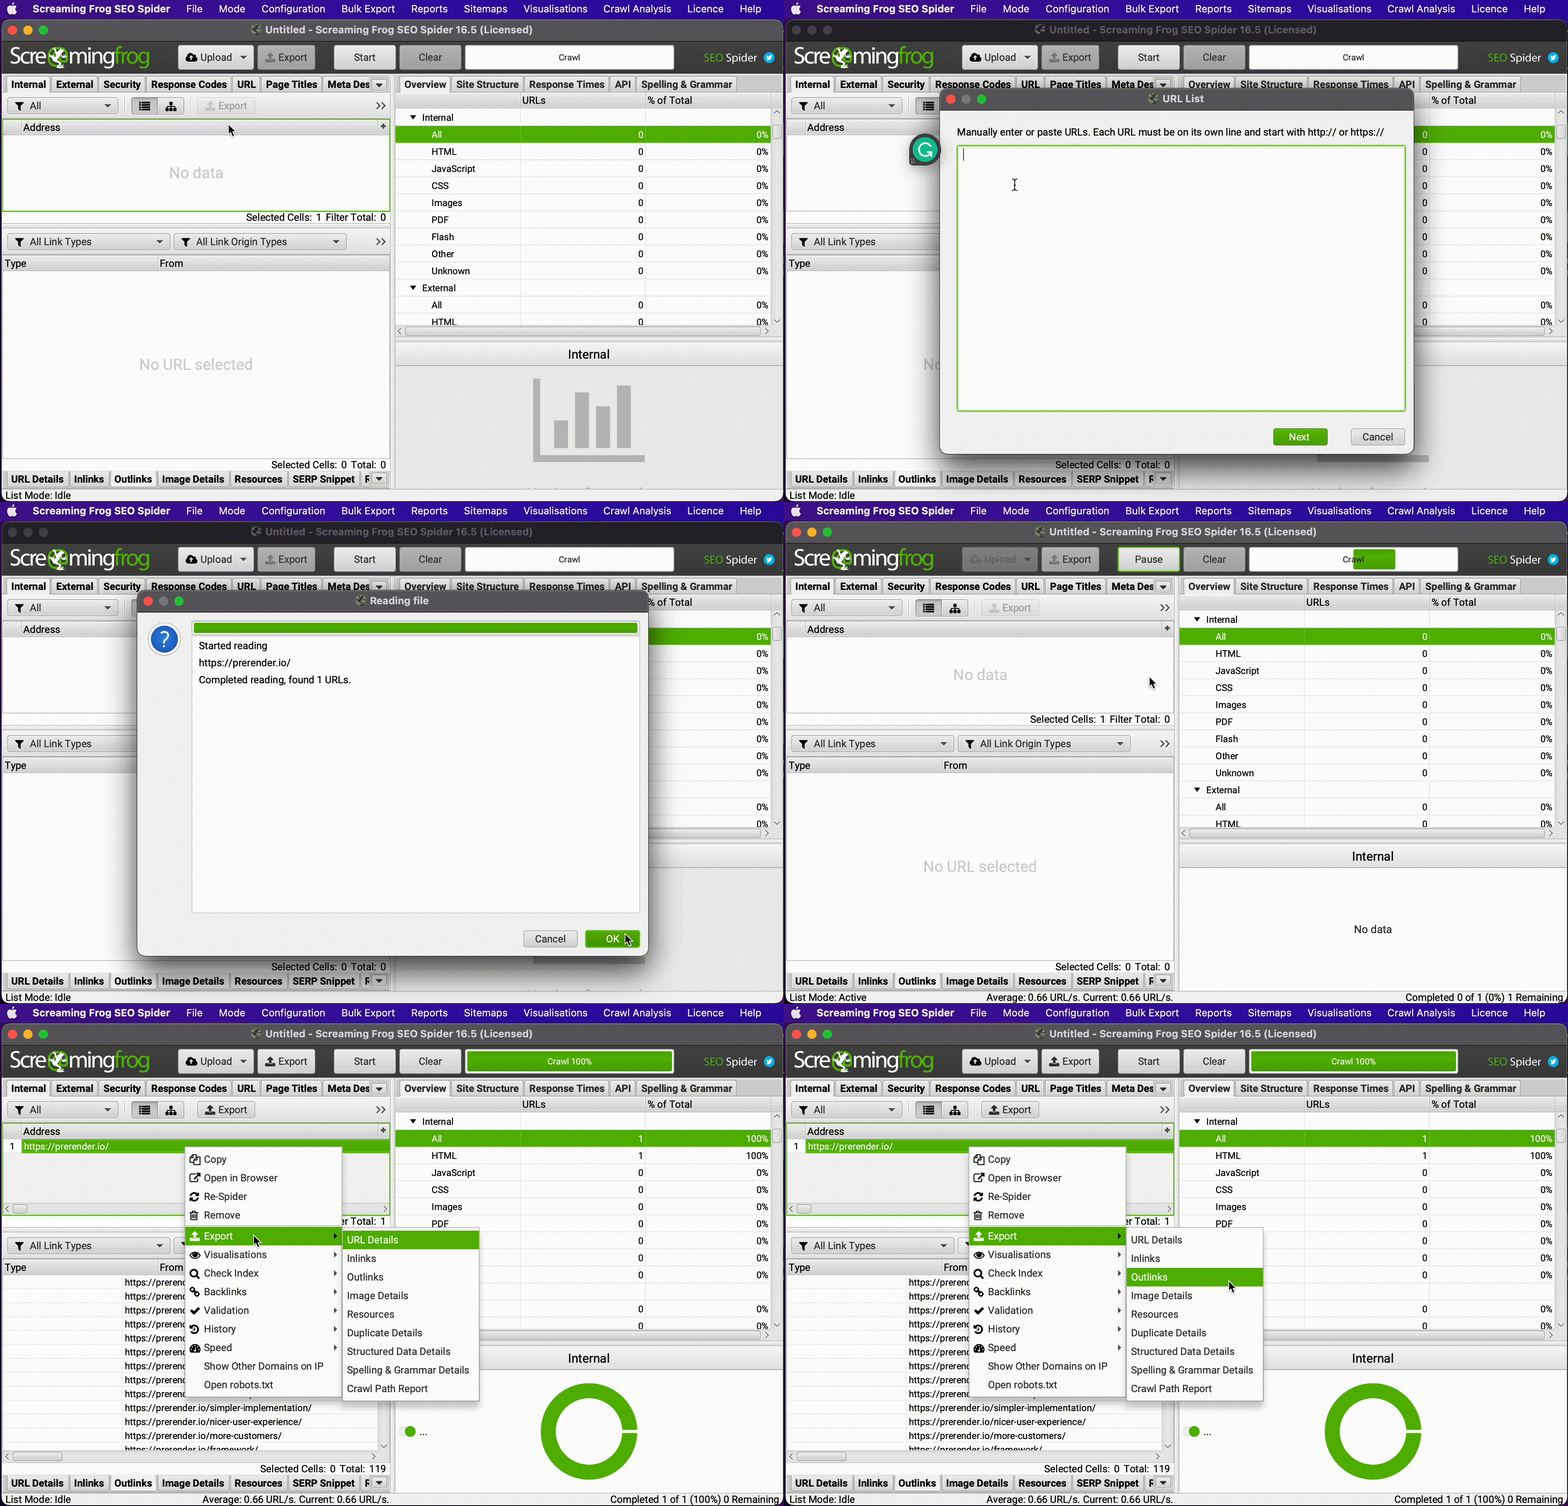
- In order to know if bots can find all links that need to be followed, crawl a specific URL you want to test for crawlability and then export the outbound links. Missing links from the outlinks report would mean a crawlability issue to resolve.
10. Using the Link Score Algorithm to Improve Internal Linking
Screaming Frog’s link score is a metric that calculates the value of a page based on the number of internal links pointing to it. This is a helpful metric for finding pages that could better leverage internal linking to help improve performance.
You’ll need to perform a crawl analysis after the initial crawl is done to get this data. Just go to Crawl Analysis in the menu and click on start.
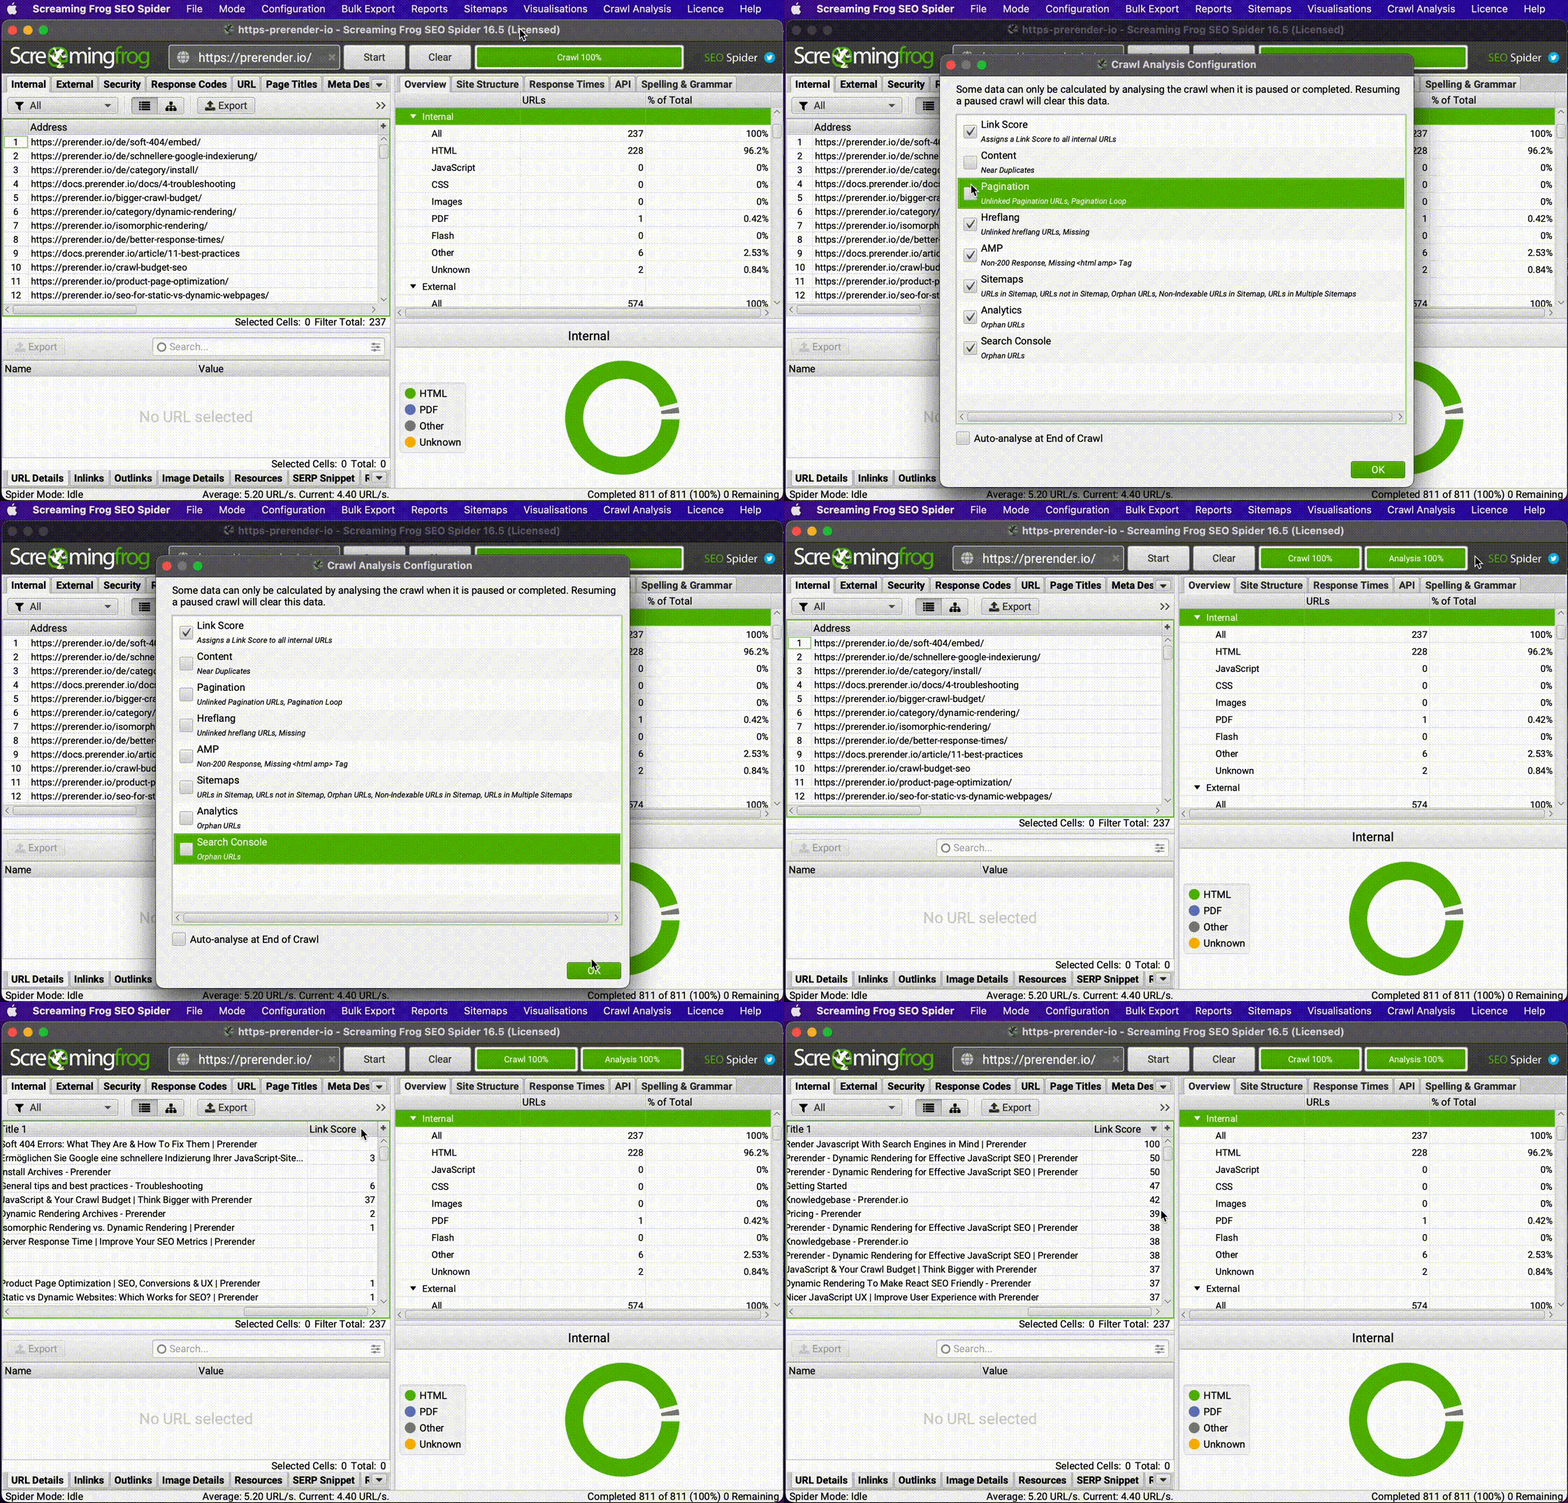
The link score can be found in the Internal tab as a new column.
11. Find Page Speed Issues Within Screaming Frog
Every page speed optimization starts with determining which pages you need to focus on, and Screaming Frog can help. Crawl your website and click on the Response Code tab. The speed data will be under the Response Time column.
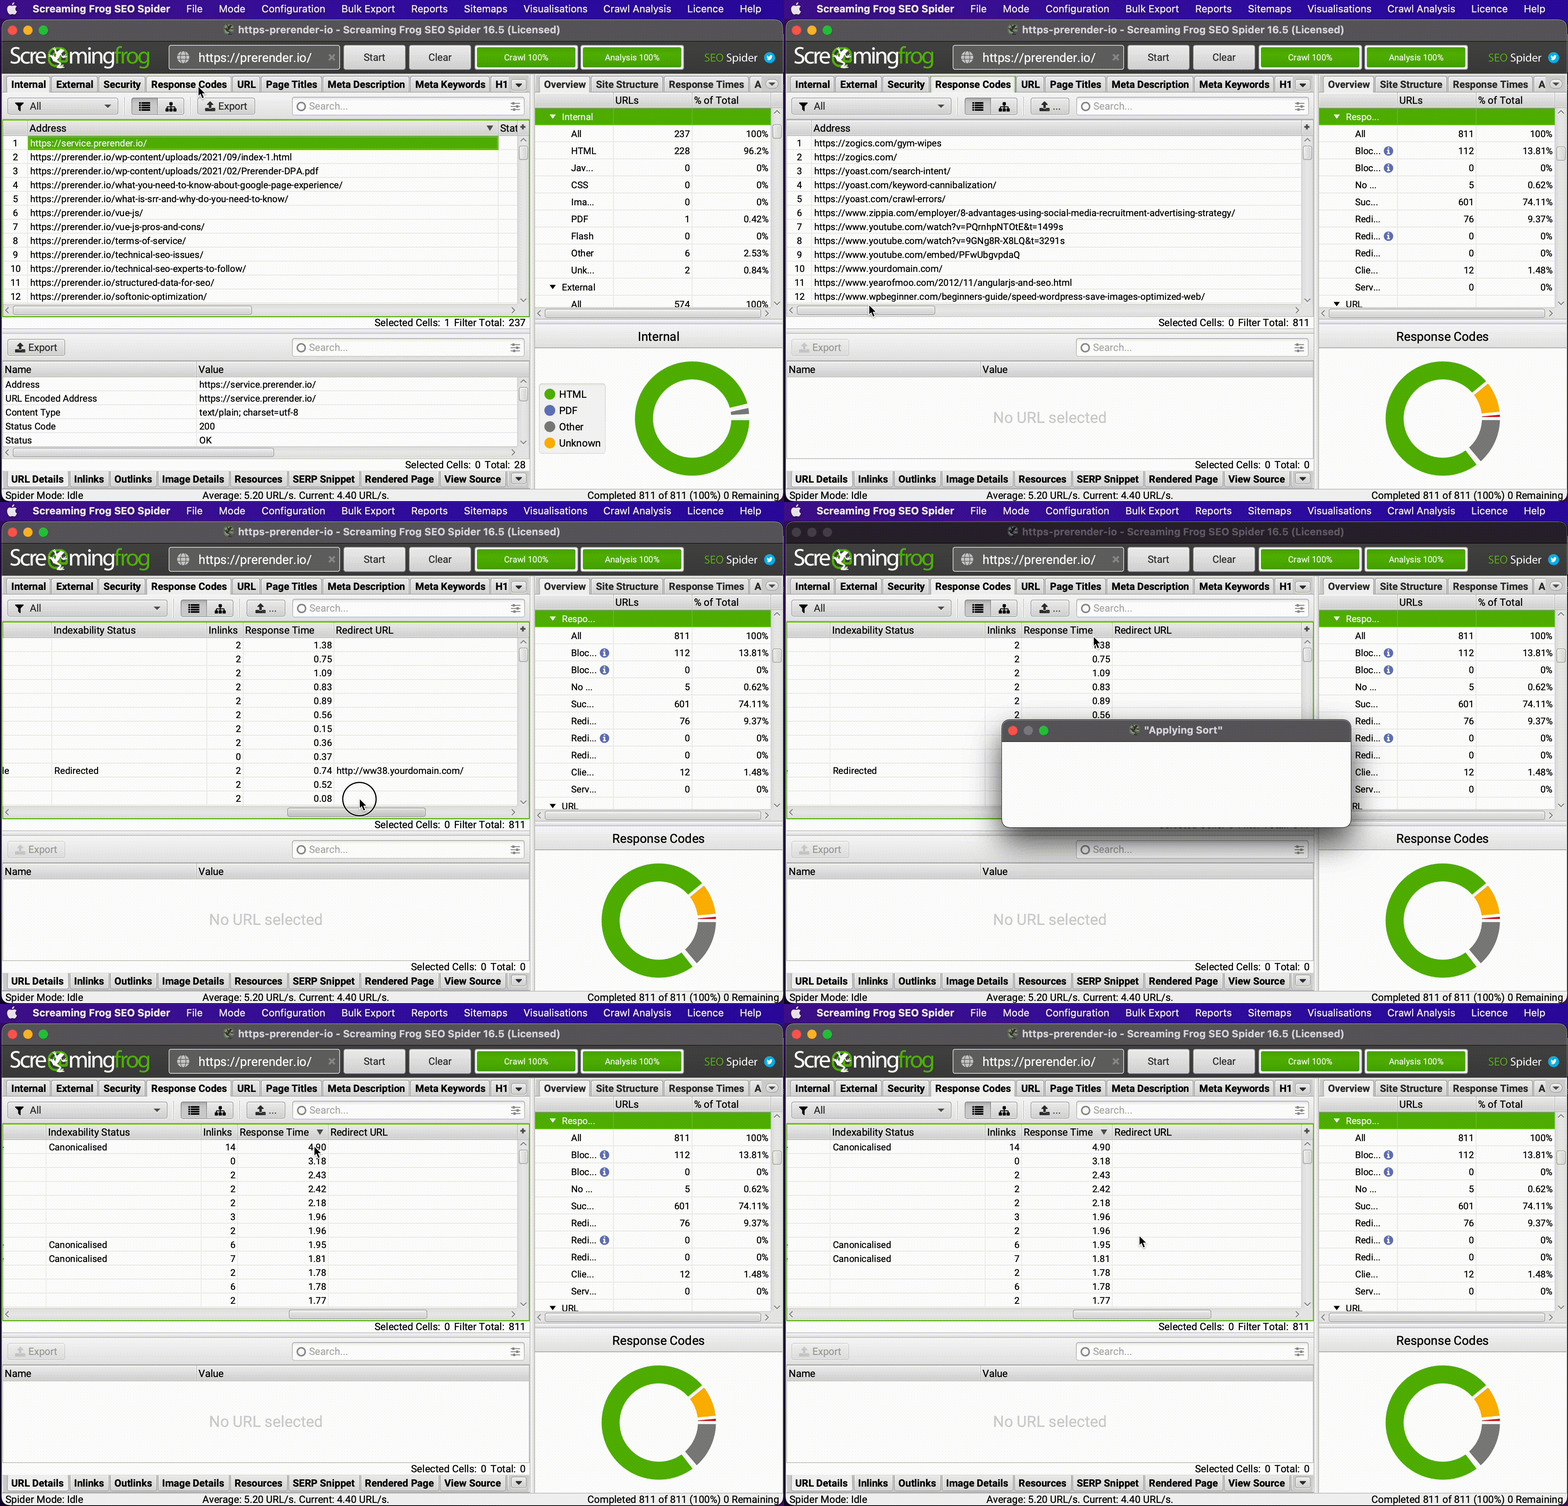
However, if you want to perform a deeper analysis, you can generate a PageSpeed Insights API key (for free, using your Google account) and connect it to Screaming Frog. Once the crawl is done, you’ll have access to a new PageSpeed Insights tab, where you’ll be able to see all page performance data for the URLs crawled.
12. Verify Google Analytics Code is Set Up Correctly Sitewide
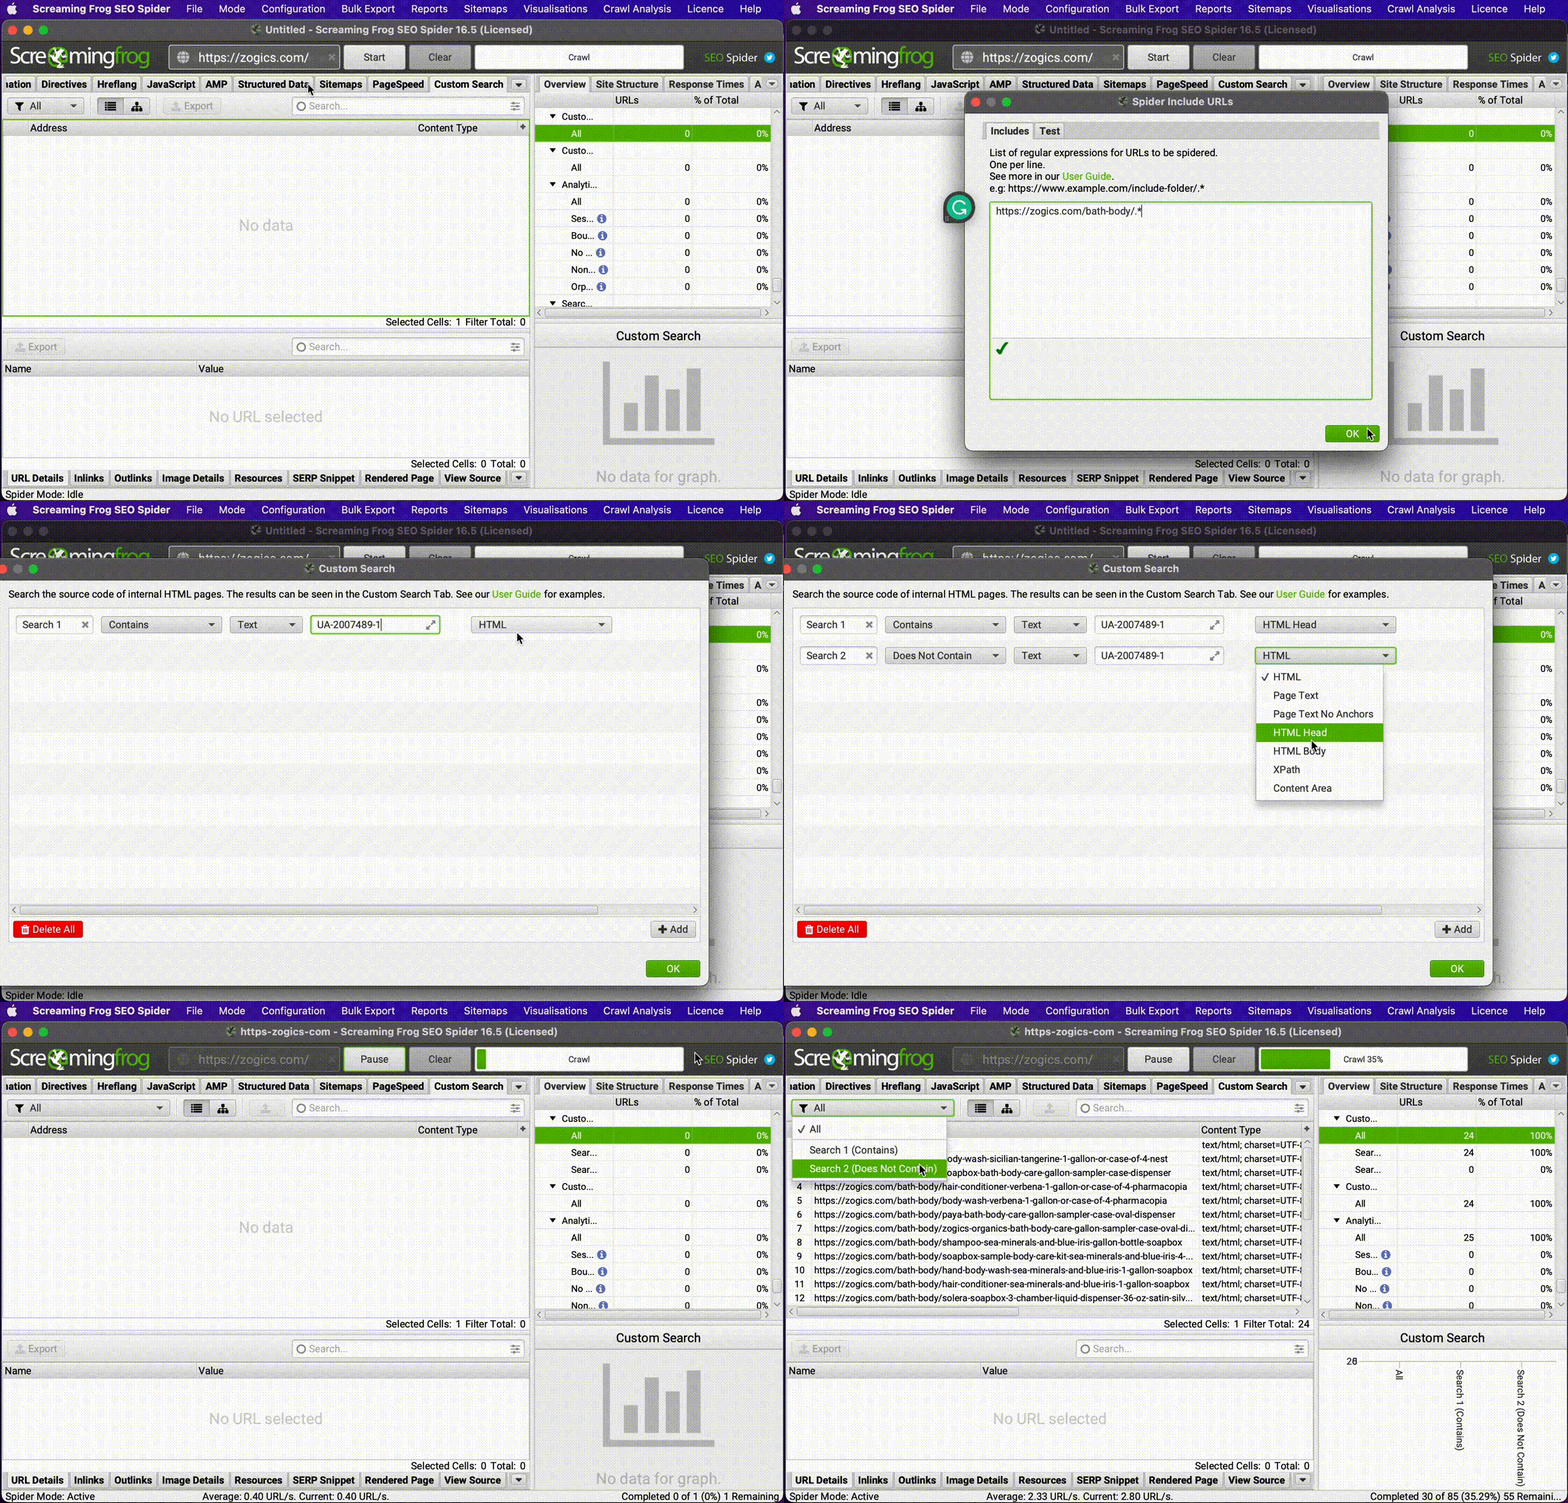
Screaming Frog can also make it easy to verify Google Analytics (GA) implementation by crawling the website and finding all the pages containing the code snippet.
To start, create two filters. One will filter for all pages containing your UA number, and the second will filter those that don’t. Also, to make it faster, you can exclude all files that are not HTML pages from the crawl by unticking the boxes from the Configuration > Spider menu.
However, if you have your code as a link, you can also add the link to the filters to find the pages containing it. For this example, let’s crawl Zogics’ /bath-body/ subfolder to find the code snippet.
13. Crawl JavaScript Sites to Find Rendering Issues
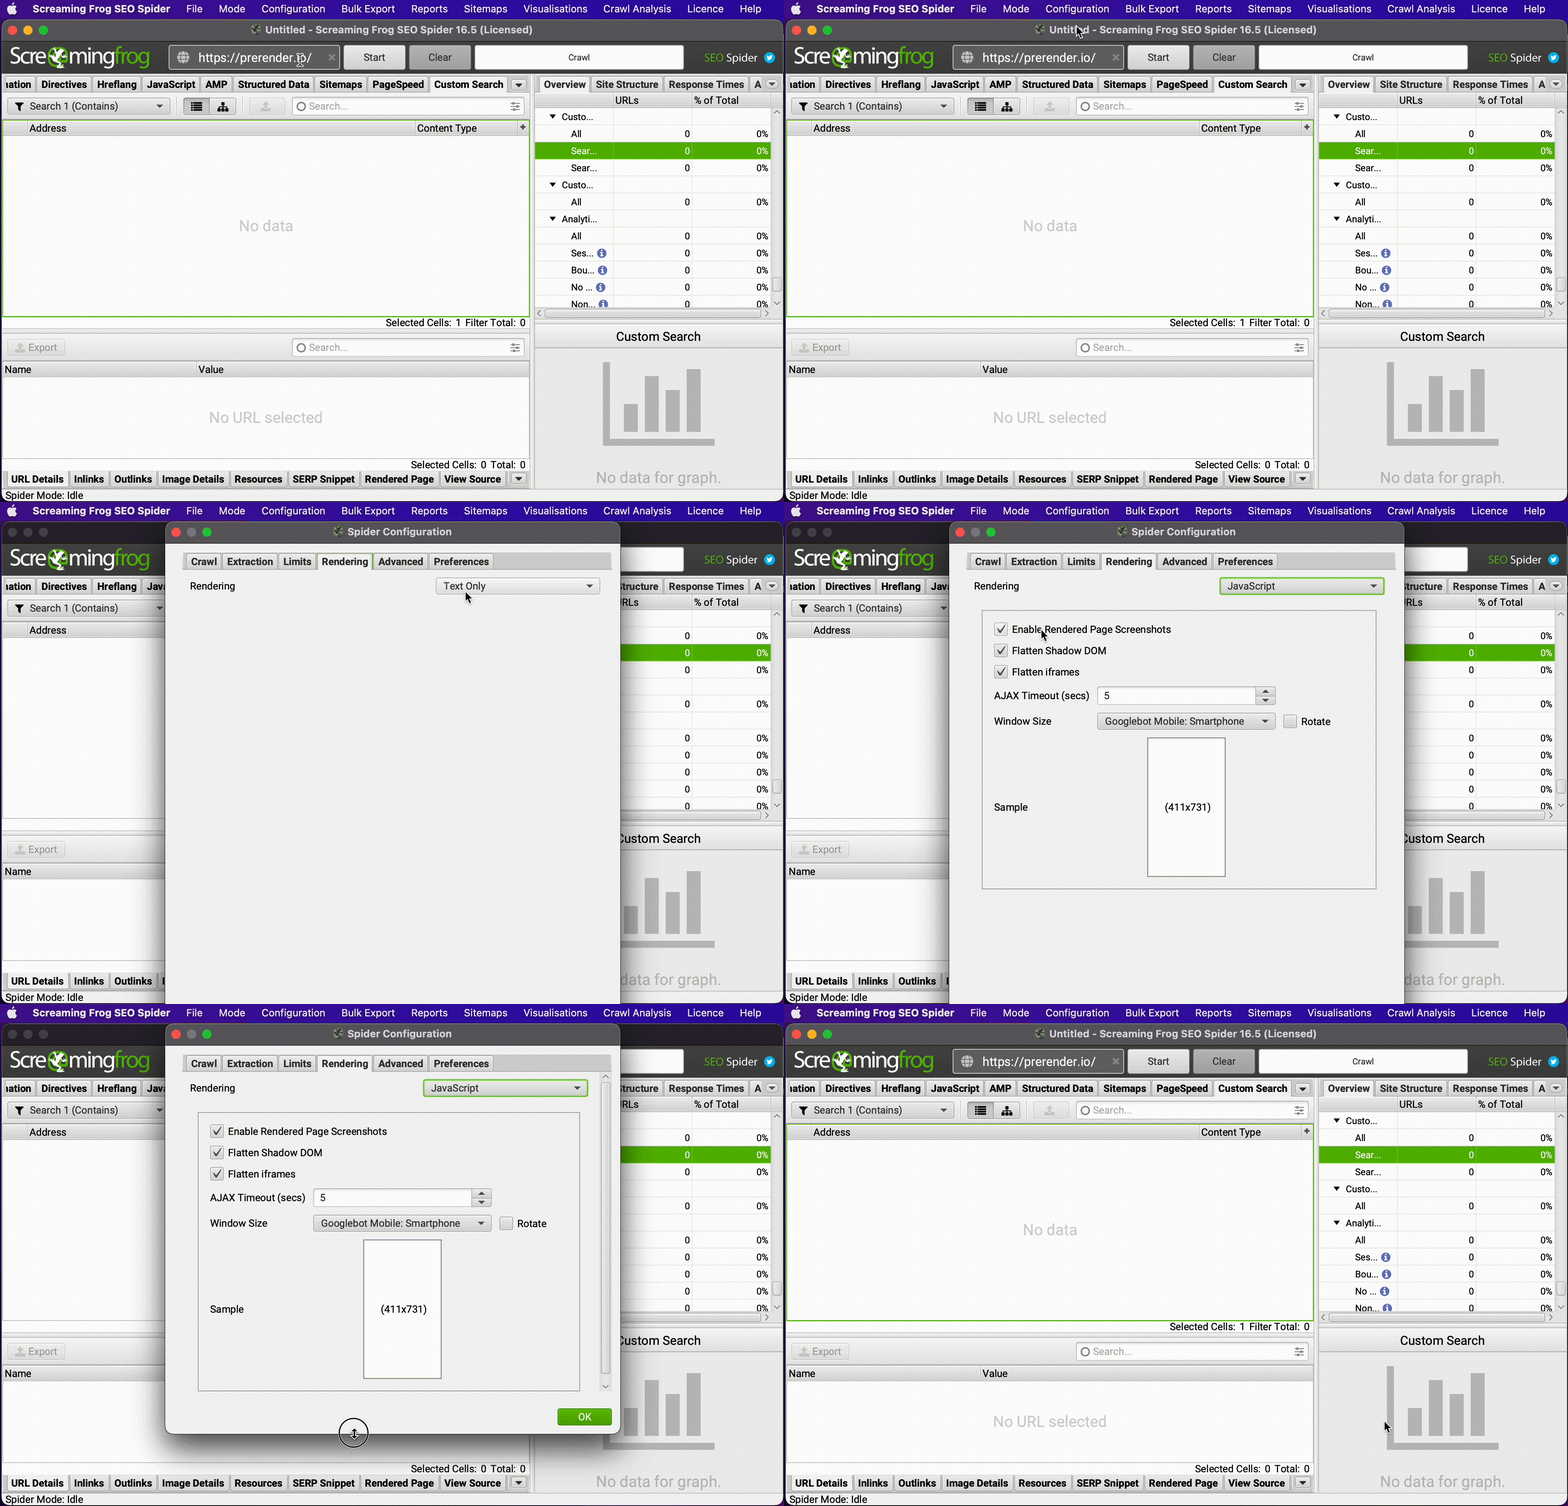
To end our list on a high note, Screaming Frog can now render JavaScript pages by just ticking one box. Go to Configuration > Spider > Rendering, pick JavaScript from the dropdown menu, and tick on Enable Rendered Page Screenshots.
You can use this function to compare Text Only vs. JavaScript crawls. This is important because you want to make sure that all your important links and resources can be downloaded by search engines.
That said, Screaming Frog can render JavaScript much better than search engines can, so it won’t be a fair representation of what Google can see if and when they finally render your JS.
For that reason, we recommend using a solution like Prerender to make sure your single-page applications and JavaScript-heavy pages are crawled and indexed correctly.
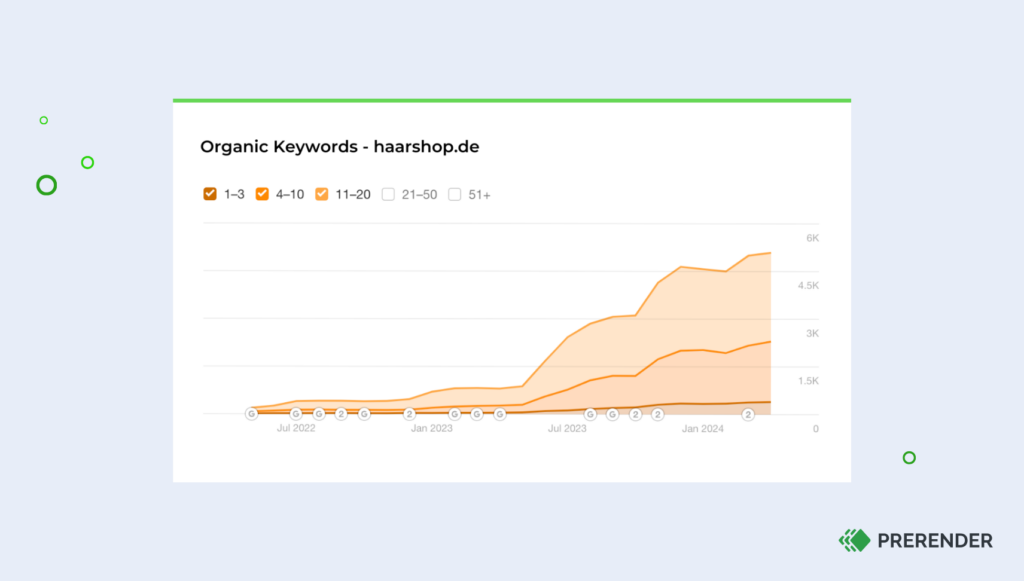
Simply by installing our middleware, users and bots will receive the correct version of your site without any extra work. Here’s what haircare webshop Haarshop saw after installing Prerender: a 99 PageSpeed score, 30% better indexing, and a 50% boost in organic traffic.
Interested in learning more? Join brands like Salesforce, Wix, and 65,000+ brands worldwide. Try Prerender today with 1,000 renders for free.

