Ever wondered why your Angular apps aren’t getting the attention they deserve on Google?
Spoiler alert: it has to do with JavaScript.
Being at the top of search results isn’t just about clicks – it’s about tapping into the $32 billion market driven by organic search traffic. With over 3.5 billion searches per day worldwide on Google, making SEO-friendly apps is critical for your business’s success and growth as it allows you to attract the right people at the right time.
Unlike other marketing channels, consumers use search engines to find what they’re interested in, so there’s no disruption or unmatched intent (like with social media ads). Instead, consumers are (based on their query) ready to convert or eager to consume your content. So the question is not whether people are interested, but rather how you make your app discoverable in search.
Before diving into the tips and tricks, we first need to understand why Angular apps have a hard time getting in search results and then discover how to build search-friendly Angular JavaScript applications.
How Search Engines See Angular
If you are reading this article, your Angular app isn’t showing on search results – or at least it’s not showing correctly. This is a common issue for single-page applications (SPA) and has to do with how search engines (SEs) “see” your pages.
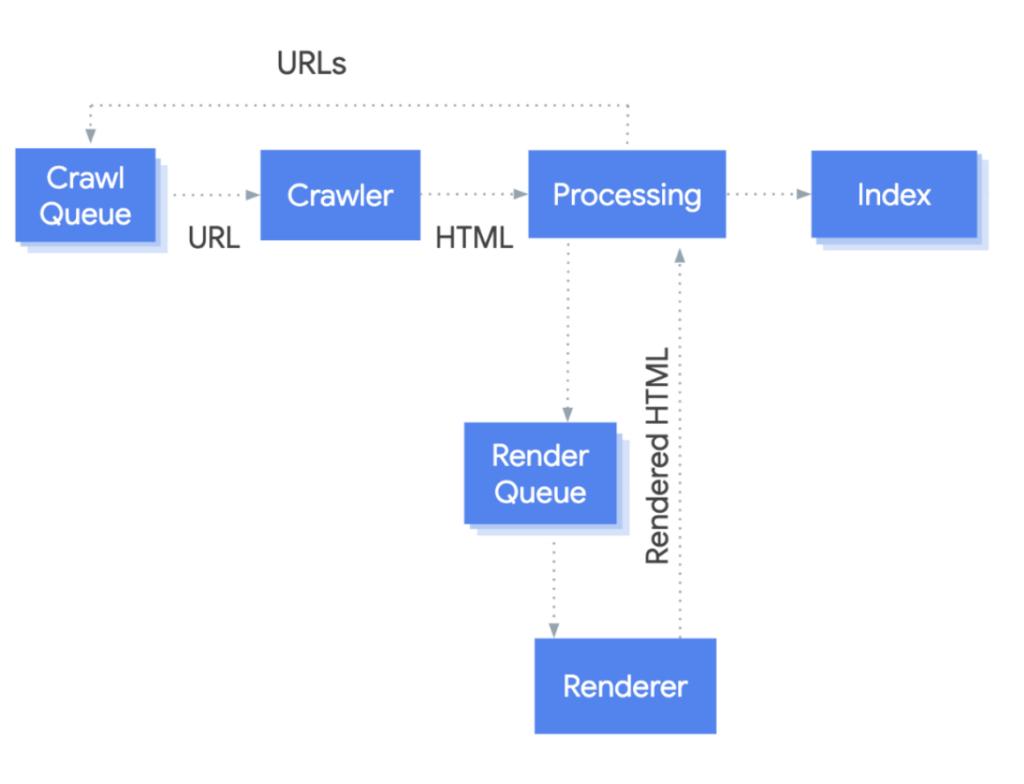
The entire process can be summarized in a couple of steps:
- First, the search engine sends its crawlers to find new pages by following links (crawling)
- When it finds your page, it fetches, downloads, and executes all necessary files to construct your page (rendering)
- After getting access to your content, it’ll find all the links on the page and sends them to the crawl queue
- Finally, it categorizes your content and adds it to its directory (indexing)
Note: Check our guide on JavaScript rendering for a more in-depth explanation of the indexing process.
So, if you are paying attention, you now understand that for search engines to see your page, they have to render your content first. Without the rendering process, all they would see is an empty page.
However, that’s exactly where things get complicated for Angular sites.
How Google Renders JavaScript Content
When search engines crawl a static site, they only receive HTML and CSS, which are easy to render as the page’s content is in the HTML file, so the rendering process is extremely fast.
The CSS file is the only thing holding things back, which might impact page speed, but SEs don’t need to do any extra steps to access your content.
In Angular’s case, the page has no content before JavaScript files are fetched, downloaded, executed, and rendered.
The problem is that most search engines can’t render JavaScript, and those that do (only Google and Bing) have a hard time rendering because of resource constraints.
Rendering JavaScript requires an extra rendering step, which pauses everything until dealt with. Here’s a representation of Google’s rendering process:
Many things can go wrong during rendering, resulting in partially rendered pages, missing content, thin content issues, and more. All problems that harm your site’s indexability and – if indexed – rankings. Read on to see why JavaScript complicates indexation.
At this point, you might be wondering: with so many issues, why would anyone use Angular to build their site? Valid question with a simple answer: user experience!
Why Use Angular?
Yes, static sites are crawlable and indexable by default, but they are also boring. JavaScript is the exotic ingredient that gives life to your site, providing dynamic content and features that keep people engaged and make their experience smoother.
Just think about navigating to an ecommerce site without filtering options. How much worse would your experience be? And that’s only one example.
Thanks to its component-based architecture, Angular makes it possible to build large, high-performing, dynamic websites faster. Because it has all the needed functionalities out of the box (so you don’t have to rely on external libraries), it makes your builds more sustainable and resilient.
Resource: Best JavaScript Frameworks: Pros, Cons, and Statistics
All of these advantages result in:
- Faster development times
- Higher conversion rates
- Higher retention rates
- Better user experience
- Increased brand recognition
Of course, SEO challenges can prevent you from making the most of your site, but like any other challenge, we can overcome them.
Angular SEO Challenges and How to Fix Them
Let’s prioritize the five most important SEO challenges your Angular app faces so you can have a rough guideline on where to start. Still, it doesn’t mean you can skip any of them, so keep that in mind.
1. JavaScript Rendering and SEO
For your pages to get indexed, you must ensure Google (and other search channels you want to appear on) can access your content. So, improving rendering is the most critical step in this journey.
There are many rendering options available, but three stand out:
Pre-rendering with Prerender
Yes, that’s us, but we created Prerender with a single goal: solve JavaScript-related SEO problems.
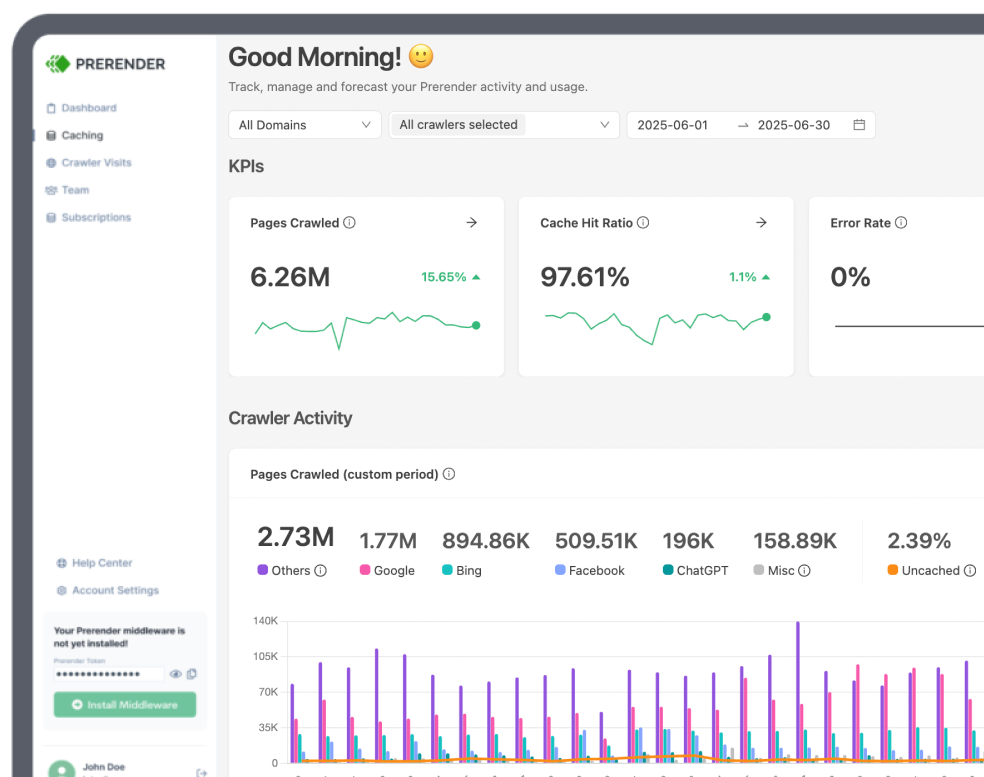
Trusted by 100k+ leading brands like Figma and Microsoft, Prerender is a plug-and-play solution that generates and caches a fully rendered and functional snapshot of your dynamic pages. When a crawler requests your page, Prerender’s middleware will identify the bot and send the snapshot instead.
Because the snapshot is fully rendered, search channels will receive static HTML with all your dynamic content (including 3rd-party scripts) ready for indexing, and because it’s functional (meaning all features were executed), all your dynamic content and features will be indexed as well.
This is an even better approach to rendering (compared to the traditional hard-code approach) as your server doesn’t have to generate nor store the snapshots, leaving your server resources free for human traffic.
Pre-rendering your pages using Prerender can save you thousands of dollars in development and maintenance time, and your website’s rendering will never be an issue again. For example, On, one of the world’s leading running shoe brands, saves millions of dollars per year by using Prerender.
If you’d like to know more, here’s a complete guide on Prerender processes and benefits, or you can try it for free to see for yourself.
Server-Side Rendering with Angular Universal (Native Solution)
As its name implies, server-side rendering (SSR) is a technique where the rendering of your pages is done on the server on demand and the resulting HTML is then sent to the client – or, in this case, to the crawler.
You can build or rewrite your application with Angular Universal to enable SSR.
The main difference between SSR and dynamic rendering is the build time. While pre-rendering generates a snapshot of the page and caches it to be reused as necessary, SSR builds your page whenever requested.
Yes, it solves the rendering issue, but for a hefty price: your server has a more significant workload, and page speed is impacted. After all, SEs must wait for your server to render the page before receiving the HTML, consuming crawl budget and hurting your Core Web Vitals.
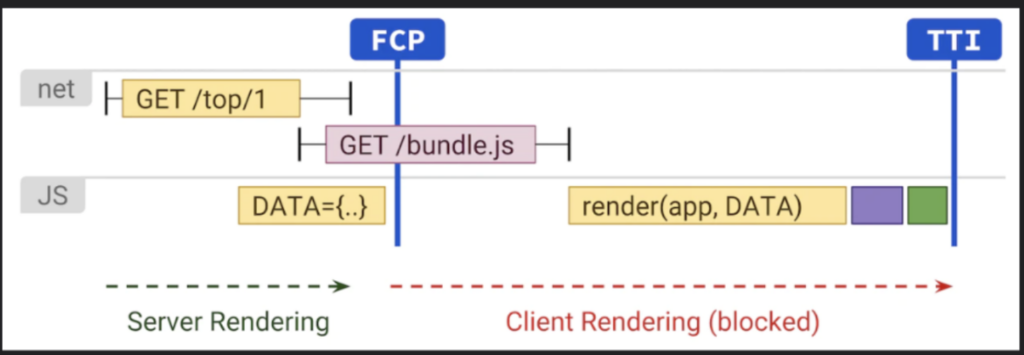
Combine Server-Side Rendering and Client-Side Rendering with (Re)Hydration (Experimental Solution)
Rehydration combines SSR and CSR by leaving the data-fetching logic and all non-interactive components to the server instead and embedding the JavaScript and data necessary for interactivity on the (pre)rendered document to be handled by the client.
Source: Web.dev
This method is still being tested but can help you provide a better experience for search engines while providing a faster rendering time for users because the main content is rendered on the server.
However, non-critical JS still needs to be executed on the client side for the page to become interactive, which can hurt your first input delay (FID) core web vital and still requires some rendering (although lesser) from the SE.
Note: Check how Prerender compares against the most popular rendering solutions for a more detailed breakdown.
2. Lack of Unique URLs for Every View
In a traditional multi-page application/website, each distinct page has its own URL. In contrast, Angular initially loads a single HTML page (the “shell”) and then dynamically replaces parts of that page based on user interactions without full-page reloads or changing the URL.
Although this provides a seamless experience for the user, for search engines, this becomes a mess of a site—search engines index unique pages, not entire websites.
Without proper URLs, Google can’t understand which page is which, as all content appears under the same URL.
As you can imagine, this can bring problems like duplicate content, crawling and indexing issues, and complicate processes like constructing a sitemap and having a clear site structure Google can follow.
To solve this problem, Angular introduced the Angular Router, a library that provides a way to manage and control routes and URLs within an Angular application.
Setting Up Angular Router
Here are some steps to implement Angular Router in your project:
- Install Angular Router
Install the Angular Router module by running the following command in your project directory:
| npm install @angular/router |
- Set Up Routes
In your app.module.ts (or a separate routing module), import RouterModule and define your routes using the Routes array. Each route should have a path and a component:
| import { NgModule } from ‘@angular/core’; import { RouterModule, Routes } from ‘@angular/router’; import { HomeComponent } from ‘./home.component’; // Import your components const routes: Routes = [ { path: ”, component: HomeComponent }, // Example route { path: ‘about’, component: AboutComponent }, // Another route // Define more routes ]; @NgModule({ imports: [RouterModule.forRoot(routes)], exports: [RouterModule] }) export class AppRoutingModule { } |
- Add Router Outlet
In your app.component.html (or wherever your main component template is), add the <router-outlet></router-outlet> tag. This is where the views of different routes will be displayed:
| <router-outlet></router-outlet> |
- Link to Routes
In your components or templates, use Angular’s routerLink directive to navigate to different views. For example:
| <a routerLink=”/”>Home</a> <a routerLink=”/about”>About</a> <a routerLink=”/contact”>Contact</a> |
3. Missing Metadata
Now that Google can access your content and discover unique URLs to associate with your content, your Angular app is taking an SEO-friendlier form.
To take it a step further and help search engines understand your content better, you need to provide as much context as possible, and that’s where metadata comes in.
Metadata are descriptive HTML tags that help search engines understand and categorize your content, enhancing your site’s visibility and relevance in search results.
Some of the most important elements to add are:
- Title – which is used in both the tab on the browser and in search results
- Meta description – a short description featured after the title in search results
- Canonical tag – which specifies the preferred or authoritative (original) version of a webpage when duplicate content exists
- Robot directives – these tags tell Google how to treat your pages
Of course, there are other meta tags you’ll want to use based on your website, but these are critical for search engines to categorize your content properly.
That said, Angular doesn’t set unique metadata from the get-go. After all, every view uses the same HTML template – where in theory, your metadata would live – so what do you do?
Implementing Metadata in Angular
To manage metadata and titles, install Angular’s @angular/platform-browser package using the following command:
| npm install @angular/platform-browser |
Then, navigate to each of your components and add the following code snippet – we’ll be using the previous component we created before.
| import { Component, OnInit } from ‘@angular/core’; import { Title, Meta } from ‘@angular/platform-browser’;i mport { ActivatedRoute } from ‘@angular/router’; @Component({ selector: ‘app-about’, templateUrl: ‘./about.component.html’, styleUrls: [‘./about.component.css’] }) export class AboutComponent implements OnInit { constructor( private titleService: Title, private meta: Meta,private route: ActivatedRoute) { } ngOnInit(): void { this.titleService.setTitle(‘About Us’); this.meta.addTags([ { name: ‘description’, content: ‘Learn more about our company and mission.’ }, { name: ‘robots’, content: ‘index, follow’ }, // Robot directives{ name: ‘canonical’, content: ‘https://yourwebsite.com/about’ } // Canonical tag ]); } } |
A Last Consideration
Something to keep in mind is that your application is delivering your pages’ metadata through JavaScript, so, just like with content, before Google renders your page there’s no metadata to index.
The good news is that if you have Prerender installed, the snapshot search engines will receive already contains your metadata, so no extra steps are needed.
4. Uncrawlable Links
The next step is to make your site structure crawlable by following the right internal linking technique.
| <a href=”https://www.example.com“>Good internal link structure</a> |
As mentioned before, Google crawls your site by finding and following your links. These crawlers are designed to spot the structure above and follow the URL within the href attribute.
A common mistake in most Angular apps is using JavaScript logic for internal links. Although they’ll work for users, crawlers won’t be able to interact with them, making it impossible for Google to discover and index your pages.
Avoid internal links like this:
| <a onclick=”goto(‘https://domain.com/product-category?page=2’)”></a> |
This also goes for pagination. Infinite pagination is great for users, but crawlers can’t scroll down to load more content, leaving all the following pages undiscovered.
If possible, use numbered pagination and implement the <a href=’URL’> logic shown above. This is the easiest way to make your pagination SEO friendly.
However, if infinite scrolling is a must-have for your users, you can try to generate your pagination in parallel.
You can see a full explanation from Delante’s team in this article.
5. Low Page Speed Scores
Page speed is one of the most critical technical ranking factors as it drips into every aspect of user experience. It is also one of the most complex topics because of the many individual elements to consider.
For a big-picture overview, we’ve compiled the most effective page speed tips and recent stats on a single page. The stats can be used as a benchmark to measure success, while the tips will help you with the overall page performance.
This article will focus on specific page speed challenges for Angular apps, which can be summarized into two main problems:
- JavaScript is render-blocking
- JavaScript takes time to load (especially on mobile devices)
Remember: JavaScript is Render-Blocking
The rendering process starts with the crawler requesting your page and the server sending it all the necessary files to render your page.
Once it gets your files, it’ll start rendering the page using the HTML file as its blueprint. When it finds your JavaScript file, it’ll stop the entire process and focus on fetching, downloading, and executing the JS code before resuming the rendering of your page.
This is what we call “render-blocking” resources, as it blocks the rendering process until it’s dealt with.
However, it is not a defect but a feature. When JavaScript is executed, the entire page will change. Sometimes, it’s just some content, and other times can be the whole layout of the page, so SEs (and browsers) need to deal with the JS file first.
As you can imagine, this significantly impacts your core web vitals – especially the largest contentful paint (LCP) and first input delay (FID) metrics), affecting your site’s page speed score.
One way to fix render-blocking issues is by deferring non-critical JavaScript (JS code that doesn’t affect above-the-fold content), allowing it to render above-the-fold content and then work its way to the rest of the page.
Here’s a complete guide on eliminating render-blocking resources you can follow. It includes code snippets you could try on your project.
Note: CSS is also render-blocking, and the guide will help you optimize it as well.
| Pro Tip: Because Prerender takes care of the rendering process for you, search engines won’t experience any render-blocking issues. The snapshot is 100% index-ready. In contrast, solutions like SSR and Hydration require search engines to render a portion of your JS code – for example, to make the page interactive. |
JavaScript is Resource-Intensive
There’s no way around it; JavaScript takes time and resources to render, and it is incredibly challenging for mobile devices.
In fact, “web pages on mobile take on average 70-80% longer to load than on desktop”.
Remember, Google moved to mobile-first indexing, so your mobile performance has more weight than desktop performance.
To help Google and users handle your JavaScript more efficiently, you can try techniques like:
- Code-splitting
- Setting browser caching policies to speed up your site from the second visit onwards
- Minifying JS files to make them smaller and faster to download
You can find more details on these techniques in our JavaScript mobile optimization guide.
| Pro Tip: Prerender delivers your dynamic content as static HTML in 0.03s average, achieving near-perfect scores across all core web vitals. Your page’s snapshot is completely rendered (LCP), stable (CLS), and interactive (FID). |
Wrapping Up
There are many moving pieces you need to optimize to make your Angular app SEO-friendly. Still, if you follow and implement these recommendations, you’ll see a significant improvement in your organic performance.
Remember, it all starts with solving the rendering of your page. Without proper rendering, Google – and most search engines for that matter – won’t be able to crawl or index your content, leaving your site out of search results.
After rendering is taken care of, the next steps (URLs, metadata, and crawlable links) are meant to guide crawlers to find your pages and understand your site’s structure.
Finally, page speed optimization is the foundation for other ranking factors to stand on when building search-friendly Angular JavaScript applications. Getting your content to search engines and users faster will give your content a huge advantage.
If you want to start seeing results in a couple of hours instead of months, get started with Prerender today.