There are few things as frustrating as spending hours writing, designing, and implementing your pages just to get ignored by Google. So, to save you the headache, we’ve created an easy-to-follow checklist that’ll help you spot any index issues and ensure that your pages get picked up by Google every time.
How to Get Google to Index Your Webpages: Follow These 10 Steps
Although you don’t need to use this checklist every time you publish a new page, these steps are SEO best practices that you have to keep in mind to prevent indexation problems. We’ll mostly refer to large websites throughout the checklist, but the same steps can be applied to new or small sites. We also included a few steps for single-page applications and JavaScript websites.
| Pro Tip 💡 The index process can take days or weeks, based on how often Google crawls your site. In the case of newer pages, use this checklist to ensure you’re not missing any essential optimization, but there’s no need to worry if the page takes a while to index. However, if the page takes longer than a month to appear on search results, it’s time to take a closer look. |
1.Find Your Indexing Problems
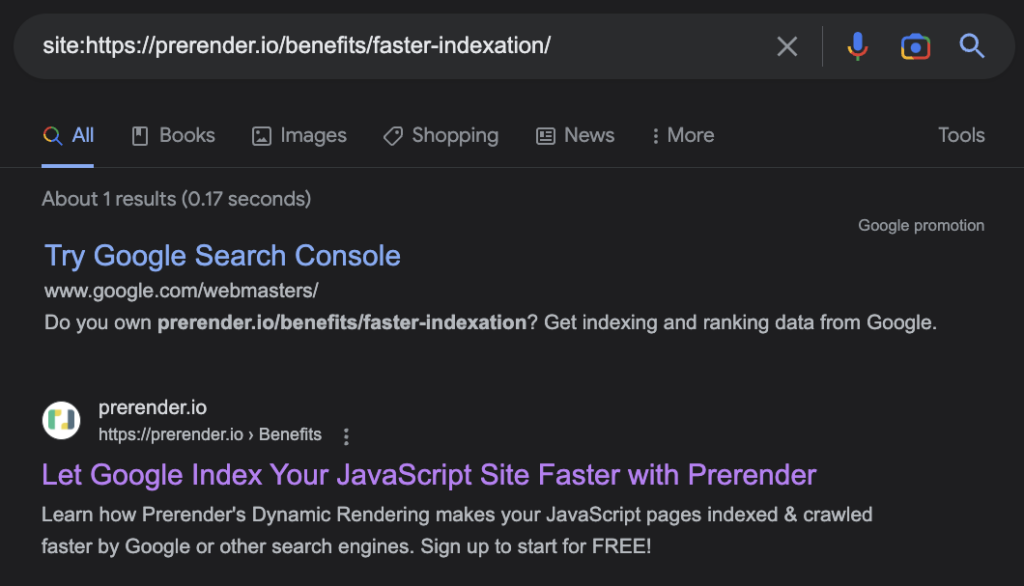
To start, let’s use the site: search operator to verify whether or not Google indexed our site/page.
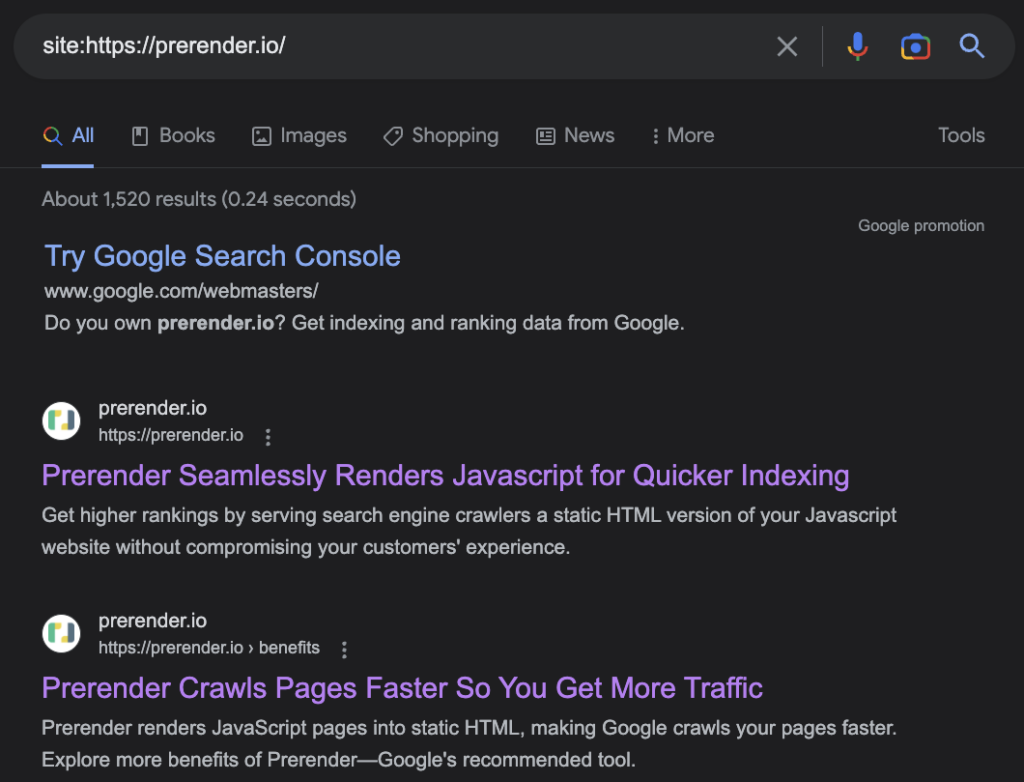
This search operator will look for every page in Google’s index that contains the domain we specified.
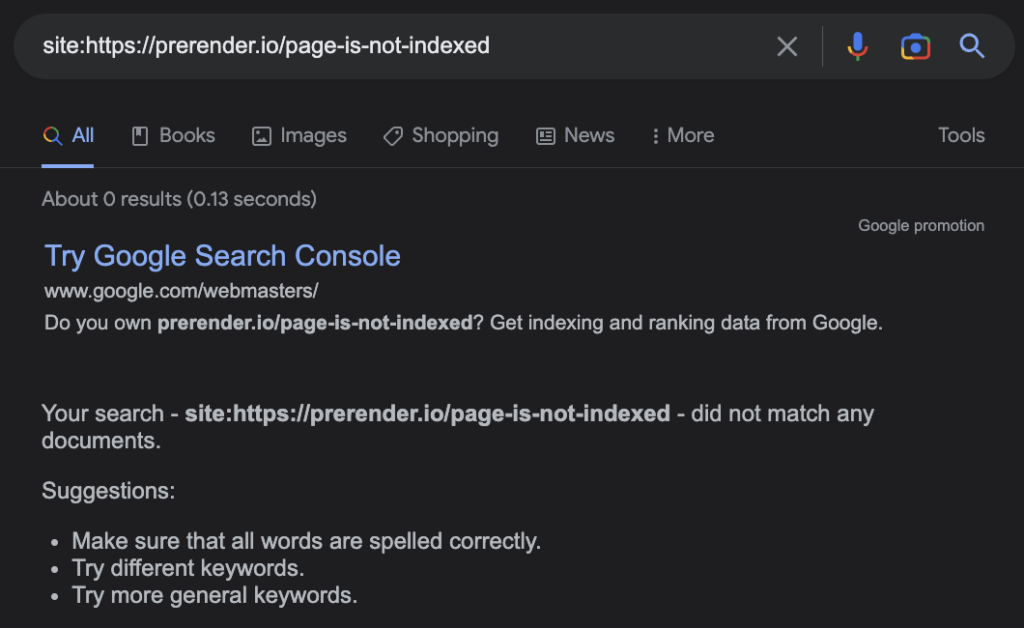
If we’re suspicious about a specific page, we can also enter the exact URL and see if Google can find it.
When it can’t find the URL, Google will show the following message:
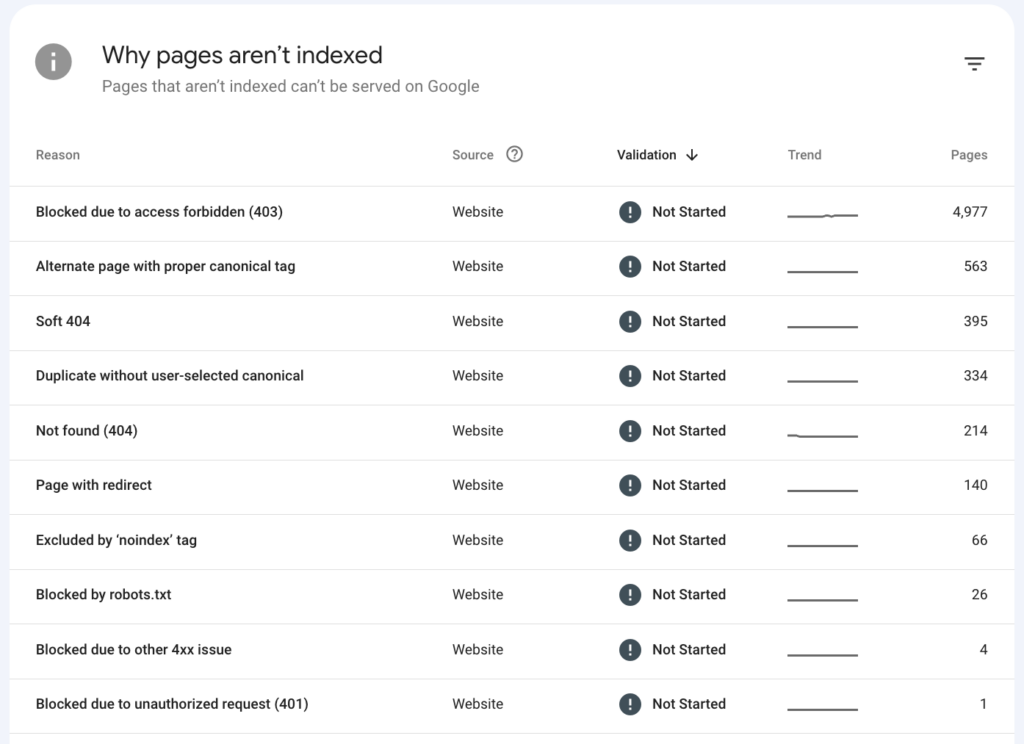
If our pages are not showing on search results, it’s time to move to Google Search Console (GSC) and see what insights we can gather. In Search Console, select your domain and click “Pages” under the Indexing tab. In this report, you’ll find clear insights into why Google chooses to ignore your URL.
Once you click on pages and scroll down, it will reveal a list of problems affecting your pages.
During this process, you must remember that not every page needs to be indexed.
In this list, you’re looking for relevant pages for searchers, like blog content and pillar pages. URLs behind login walls, for example, are supposed to be left out of the index, so you can ignore those ones.
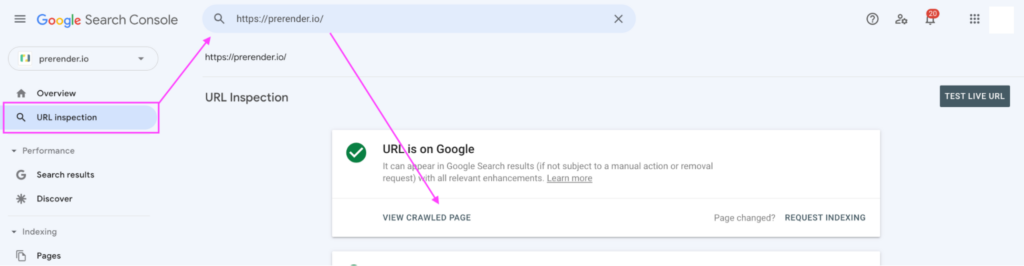
If you already have a list of pages you know are not getting indexed, you can skip this part and use the URL inspector tool:
Here, you’ll find more detailed information about your URL status, like when it was crawled last time and how it was discovered. Most importantly, for this exercise, it’ll tell you the reason the page wasn’t indexed.
Note: Although it’ll let you know one reason, more problems might be impacting your site indexability, so we encourage you to follow the rest of the checklist to improve your indexation ratio.
2. Check Your Robot Directives
One of the most common and easiest issues to fix is having robot directives interfering with your page indexation. There are three places to check for this problem:
1. Check the On-Page Robots Meta Tag
The robot meta tag tells Googlebot how to treat your page. If your page has a no-index tag, it’s telling Googlebot that you want this page to be crawled (so crawlers will discover the page) but not indexed (Googlebot will keep the page out of the SERPs). To quickly find it on your page, navigate to the page and, once on it, open the DevTools (right-click + inspect) – you can also find it on the source code.
Click on “Inspect” under View Page Source.
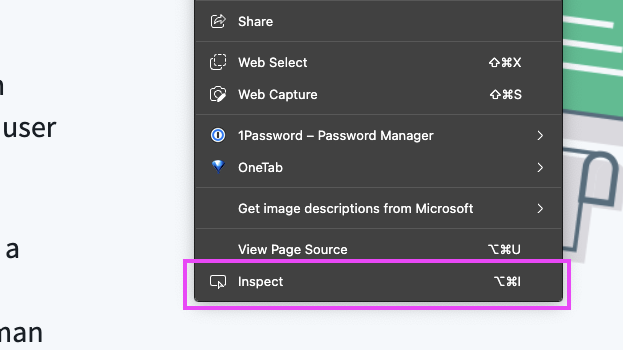
Then, use CMD + F (or CTR + F on Windows) to look for “robots” to find the tag quickly.
You can also look for “noindex” directly, but sometimes the tag can appear on scripts, making the process longer as you have to navigate through the different findings.

If you find a no-index meta tag, you just need to change the directive to “index, follow” on your backend.
For WordPress users, go to settings > reading > search visibility and uncheck “Discourage search engines from indexing this site.” (Note: You’ll find a similar functionality on other website builders.)
2. Check Your X-Robots-Tag HTTP Header
Another way to deliver robots directives to search engines is through the X-Robots-Tag, which adds the directives as part of your page’s HTTP response.
You can use the Robots Exclusion Checker chrome extension to check if this is your case.
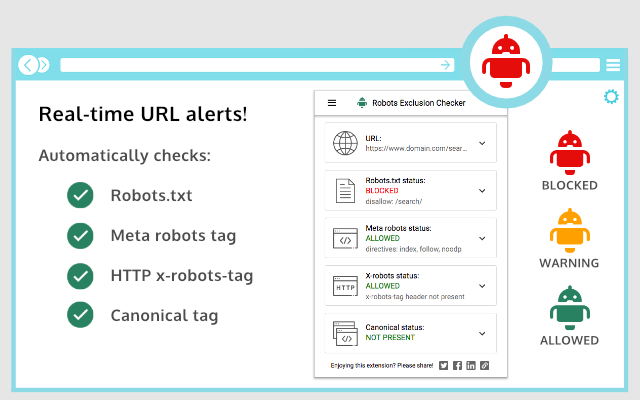
Solving this problem is more technical than the robots meta tag, so you’ll need the help of a developer to configure your server’s X-Robots-Tag header.
3. Check your Robots.txt File
The robots.txt file is the first document crawlers will check to understand how to crawl and treat your pages.
In some cases, you could be blocking Google from indexing entire directories, making it impossible for its crawler to index your pages. To access your robot.txt file, enter your homepage URL on the browser with the ending /robots.txt.
For example, to access our robots.txt file, we would enter https://prerender.io/robots.txt.

This is a delicate file because a bad change can harm your site’s crawlability.
You can use our guide on robots.txt file optimization or hire an expert to help you with it.
3. Add Internal Links Pointing to the Unindexed/New Page
Before your pages can be indexed, they must be discovered during crawling.
There are two main ways Google finds your pages:
- By following internal links
- By following the links in your sitemap
Internal linking is not just good for visitors as they can find other relevant pages after arriving on your website, but they also help Google discover deeper pages on your site’s structure.
If you’re experiencing indexing delays or problems, think of two to three pages (the higher on your site’s architecture, the better) where you can add a link pointing to the new/unindexed page – extra points if they are related to one another. Remember, if no internal links are pointing to the page (orphan pages), then Google won’t be able to find it, and thus, it won’t be able to index its content.
4. Add Your Page to Your Sitemap
Your sitemap works as a priority list of URLs for Google. When you submit a sitemap through the search console, you’re telling Google that these pages should be indexed first, making it a great place to add important pages you want Google to consider in their results.
Many site builders have a built-in sitemap generator feature, but they allow you to modify it.
If your page is not on the list, add it manually to ensure Google can find it. You can also follow this Screaming Frog’s guide to generate a sitemap from a crawl and submit it manually through GSC.
5. Make Sure the Web Page Isn’t Canonicalized
On large and/or dynamic websites, is common for several pages to be very similar to each other (e.g., product and category pages on eCommerce sites), this can bring a lot of duplicate content issues.
To prevent this, we can use a canonical tag (rel=”canonical”) to tell search engines which URL is the most important and should be indexed while the other non-canonical URLs get ignored.
It’s a great way to consolidate signals from pages with similar content and avoid getting negative SEO scores due to duplicate content.
To check whether or not the unindexed page is canonical, navigate to the URL and inspect the page. You can look for “canonical” in the page’s code and see what the specified URL is.

The href value should be the same URL as the one you want Google to index. Otherwise, Google will exclude it from the SERPs.
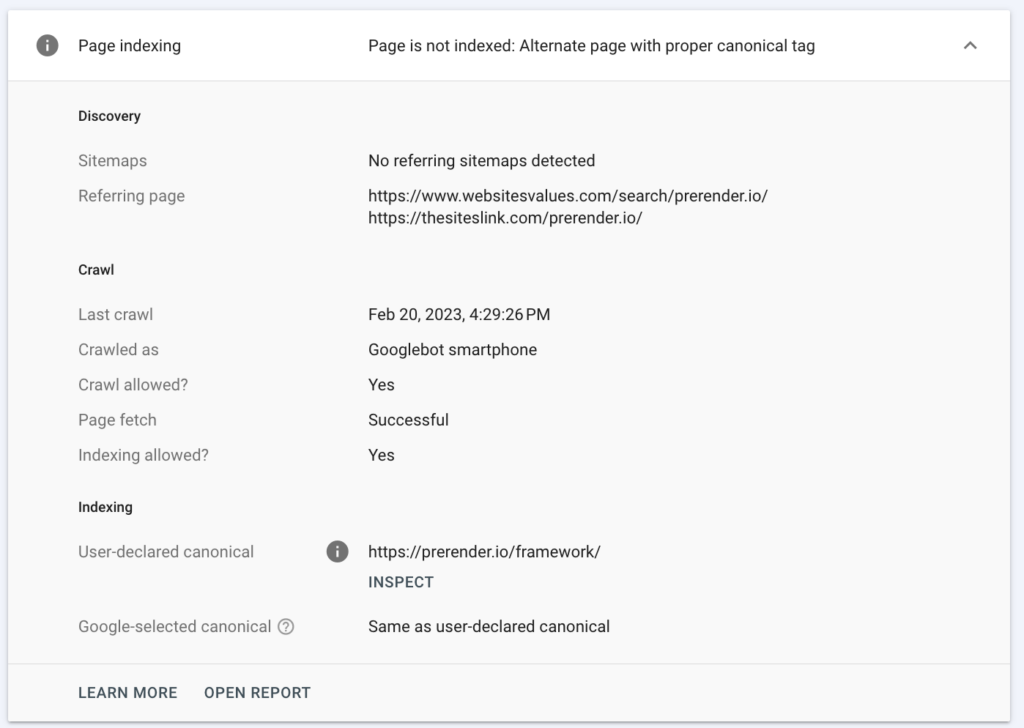
However, if you’re already facing problems with duplicate content, Google could be choosing a canonical URL for you, causing your page to be ignored. To check if that’s the case, look for your page on Search Console under “Alternate page with proper canonical tag” in the No Indexed report.

If you find your page here – even if the right canonical is set on the heading –you’ll want to update its content to be as unique as possible and fix all duplicate content issues to get your pages on search results again.
6. Are You Blocking Resources from Getting Crawled?
Over the years, we’ve seen many large websites trying to improve their crawl budget by blocking resources like JavaScript and CSS files.
The belief behind this strategy is that by reducing the number of files crawlers need/can download, they will free up their crawl budget for HTML pages, which are the documents you want Google to index.
However, this idea comes from misunderstanding how the indexing process works. In reality, for Google to see your content – especially if you’re using JavaScript frameworks or using JavaScript to change the page’s content in any way – it needs to download all necessary resources to render your page.
Once Google crawls your URL, it’ll use all related files to create a visual representation of your HTML file, similar to what your browser would do. If Googlebot is blocked from accessing these files, it won’t be able to see your content as users would, resulting in Googlebot ignoring your page.
Note: In some cases, Google might partially render your page and index the content it finds, but this usually causes missing content and low SEO scores.
These resources are typically blocked through the robots.txt file like this:
| User-agent: *Disallow: /*.jsDisallow: /*.css |
If that’s your case, you can change those lines to “Allow” or just delete them. Google should pick up the changes on its next crawl. (Note: This can affect your site even if you’re not using JavaScript to deliver content. Google will still need to crawl CSS files – for example – to generate a paint of your website and measure things like mobile-friendliness.)
7. Is Google Rendering Your Content Properly?
A big problem with dynamic content is that it requires extra resources from Google to render and index it. When you have a large site, this can quickly eat up your crawl budget, causing timeouts and producing issues like missing content, low page speed scores, and content quality issues.
This worsens for websites delivering content through JavaScript, like links and metadata. If Google can’t render your entire pages, it can be missing:
- Internal links – creating crawling issues
- Blocks of content – potentially flagging your pages as thin content
- SEO elements like robots directives, canonicals, and titles – making your pages dependent on Google’s decisions like choosing a canonical URL for you and ignoring the directives you’ve set
If the problem persists, Google can start deprioritizing your website due to low-quality, reducing your crawl budget and making these issues more predominant – A whole cycle of doom.
How to Check for Rendering Issues
Checking for rendering problems it’s still a very manual process.
First, inspect the affected URL using the Inspecting Tool on GSC, then click “View Crawled Page.”
You’ll see three tabs with more details about your page.
Go back to your site and grab an element that can only be seen after rendering (for example, a piece of text injected through JavaScript) and look for it on the HTML tab back on Search Console.
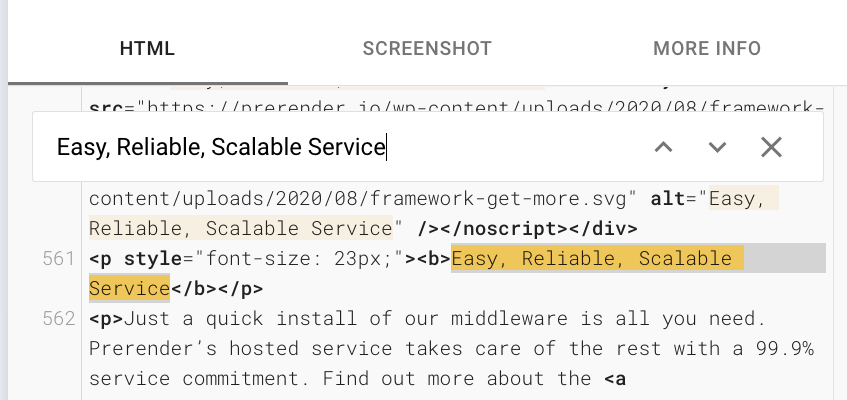
If you can’t find your element, it clearly indicates that Google is having trouble rendering your content.
Fixing Rendering Issues for Enterprise and Dynamic Websites
To resolve this issue at scale, implementing dynamic rendering with a tool like Prerender is the best solution. Our tool will fetch all your files to render your pages on its server and cache a snapshot of the fully-rendered version of each one, finally serving it as static HTML to search engines.
In just a week, you’ll see 100% rendering ratios and all missing content-related issues solved.
Resource: Learn How Prerender Works
8. Ensure Fast Server Response and Loading Times
Page speed has been a ranking factor for a while and has gotten much attention lately with the Core Web Vitals update. But did you know that it can affect your indexation as well? It all comes down to crawl budget.
Slow server responses and long page loading times make the crawling and indexing process take more time and resources from Google. This signals a bad user experience for Google, which can determine that your website should be deprioritized. After all, what’s the point of indexing a low-quality website?
Several elements influence your page speed, so in this section, we’ll focus solely on the main three optimization factors you should focus on first:
Upgrade Your Hosting and Servers
Google will try to send as many requests and as fast as possible to crawl your site but without overwhelming your server. When the server response time slowdowns, it’s a signal for the Searchbot to slow down or even stop crawling the site.
Upgrading your hosting plan allows you to allocate more bandwidth to handling crawling traffic. Improving your server response time will signal to Google your site can endure faster, more often crawls, and a higher number of requests.
Optimize Your Code and On-Page Elements
Of course, your code and elements like images can have a significant impact on your site’s load speed. Here are three good places to start:
- Optimize your images – compressing your images and using formats like JPEG or WebP are great ways to keep file sizes small.
- Eliminate render-blocking resources – this is usually caused by JavaScript, as the browser (and search engines) must stop any other processes until JS files are downloaded and executed. A good way to handle this problem is by deferring your JS.
- Reduce TTFB latency – your server and hosting plan greatly influence TTFB latency, so upgrading them should help. Another thing to consider is using a CDN to deliver your content faster.
Check our page speed optimization guide for a more detailed action plan.
Use A Pre-Built Rendering Platform
The biggest roadblock for perfect page speed scores is JavaScript, and there’s only so much you can do to optimize it before realizing it’s just not enough to score higher than 75/100, but why?
When your browser renders a site, it uses your machine’s processing power to do so, which is only being used to render that page. In Google’s case, it needs to process millions of URLs. Each URL requires processing power, and there’s only so much of it – that’s why crawl budget isn’t infinite.
No matter how well-optimized your site is, there’s a point where Google can’t handle it any faster, thus providing you with a lower score.
That said, when using a pre-built rendering platform like Prerender, your pages are served fully rendered and functional from our cache, taking 0.05 seconds on average for Google to receive the HTML version of your site without the need for any extra processing.
That means that from the moment Prerender delivers your page, it is fully loaded and ready to be indexed, getting you almost perfect page speed scores (90/100 and higher) and a 0.05 seconds server response time.
Here are the traffic results that Haarshop noticed after implementing Prerender:
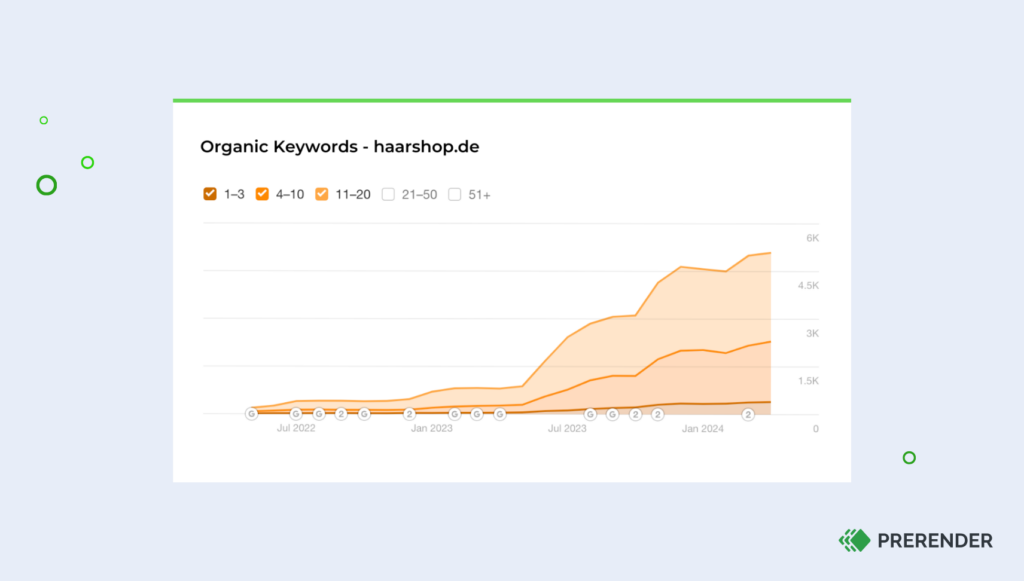
Case Study: How Haarshop Achieved 30% More Indexing, a 99 PageSpeed Score, and 50% More Traffic
9. Check the Removal Tool for Temporary Blocks
If you’ve been updating your pages to remove sensitive information, it’s possible your team has submitted some URLs to Google’s removal tool, and it’s not uncommon for some meaningful URLs to get mixed in the list.
To verify this, go to Google’s removal tool to see all blocked URLs. After finding the URL you want to unblock, click on the menu next to your URL and select “Cancel request.”
10. Submit Your URL for Indexation
Once you’ve found and dealt with the problem affecting your pages, it’s time to go to GSC and submit the URL for indexation by inspecting the fixed URL and clicking on “request indexing”.
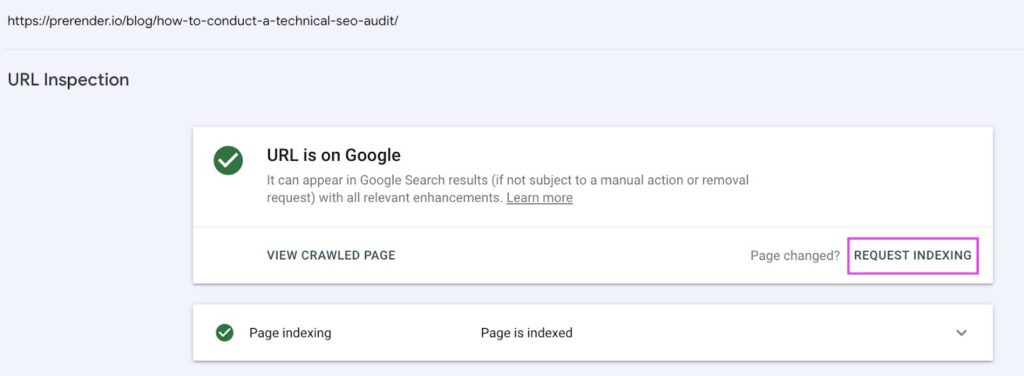
Although it doesn’t guarantee Google will crawl the page immediately, it works as a “heads up” to tell Google you’ve made some changes to the page and want Googlebot to crawl it as soon as possible.
Following this checklist will give you faster indexing times and better SEO performance overall.
In many cases, fixing indexation issues is more about ensuring you provide the right signals, like page speed and robots directives. However, for enterprise and dynamic websites, it’s vital to consider rendering.
Using Prerender to solve indexing problems is not only effective but cost-efficient. It requires near-zero development investment, and you’ll get the full benefits after just one week, getting you an ROI faster than more complex and expensive solutions like server-side rendering. Create an account to try Prerender for free or choose the plan that best suits your needs.
FAQs
How Often Does Google Recrawl and Reindex My Site?
Google doesn’t have a set schedule for crawling and indexing. The frequency depends on various factors such as: how often your site is updated, its authority, and how important Google deems your content. High-authority sites with frequently updated content may be crawled daily, while smaller or less frequently updated sites might be crawled weekly or monthly. You can influence crawl frequency by regularly updating your content, keeping your technical SEO in check, and maintaining a healthy, fast-loading site with tools like Prerender.io.
Can Having a Lot of Low-Quality Pages on My Site Affect Google’s Indexing of My Important Pages?
Yes, having many low-quality pages can negatively impact Google’s indexing of your important pages. This is often referred to as index bloat. When Google encounters numerous low-quality pages, it may waste its crawl budget on these pages instead of your more important content. Best practice? Ensure all pages on your site provide value, and/or use noindex tags or remove low-quality pages that don’t need to be in Google’s index.
How Does Mobile-First Indexing Affect the Way Google Indexes My Site?
With mobile-first indexing, Google mainly uses the mobile version of your site for indexing and ranking. This means that if your mobile and desktop versions are significantly different, Google might not see content that’s only visible on the desktop site.
To ensure proper indexing for both, make sure that:
- Your mobile site contains all the important content from your desktop site
- You use responsive design if possible
- Your mobile site is easily crawlable and doesn’t block resources like CSS or JavaScript